The Mozilla Firefox Internet Browser does a fantastic job of saving your usernames and passwords so you don’t have to remember them next time you visit a website. While this feature is a great tool, Firefox doesn’t include a good backup method to save passwords and user accounts in case you need to restore or copy them to a safe location. You can backup your entire Firefox directory, but if you just want to keep a backup copy, or you need to sync them with another computer, the Firefox extension Password Exporter is all you need.

How to Export Saved Passwords Out of Firefox

The Firefox add-on Password Exporter lets you export and import you saved usernames, passwords, and disabled login hosts between computers or just to keep as a backup copy. All of your saved passwords will be exported to an XML or CSV file and can be encrypted for protection.

To install Password Exporter go to Tools >> Add-ons. Search for Password Exporter, click on “Install Now”, follow the instructions, and then restart Firefox after the installation is completed.

Access Password Exporter from Tools >> Options and select the Security Tab.

Locate the “Import/Export Passwords” button in the Saved Passwords section:

To export, click on the “Import/Export Passwords” button and select “Encrypt Usernames/Passwords” check box (recommended for security purposes) then click on “Export Passwords”.

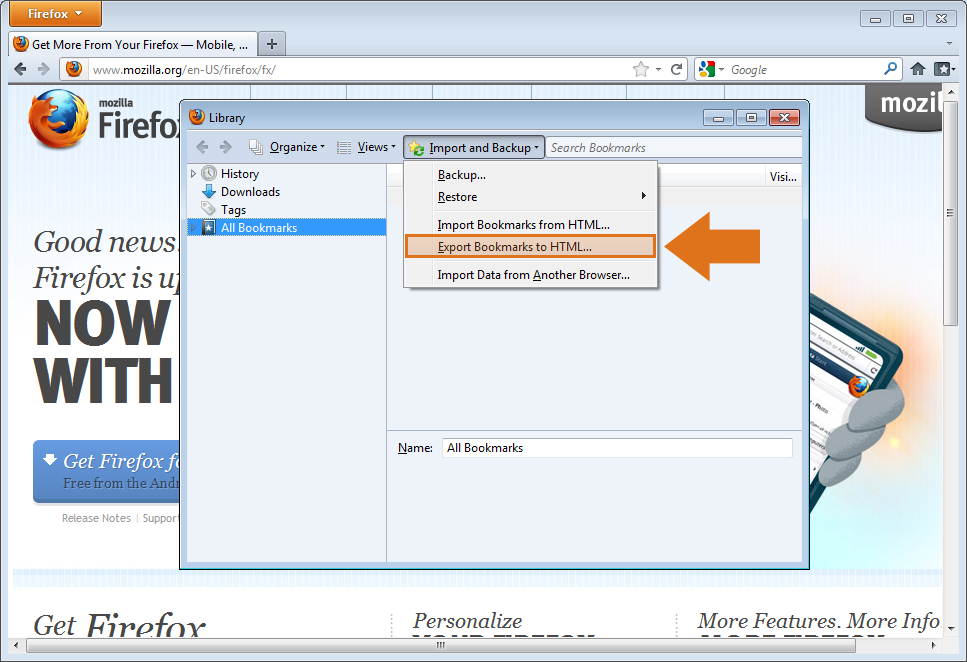
To save the file, give it a name and select to either save it as a XML or CSV file.

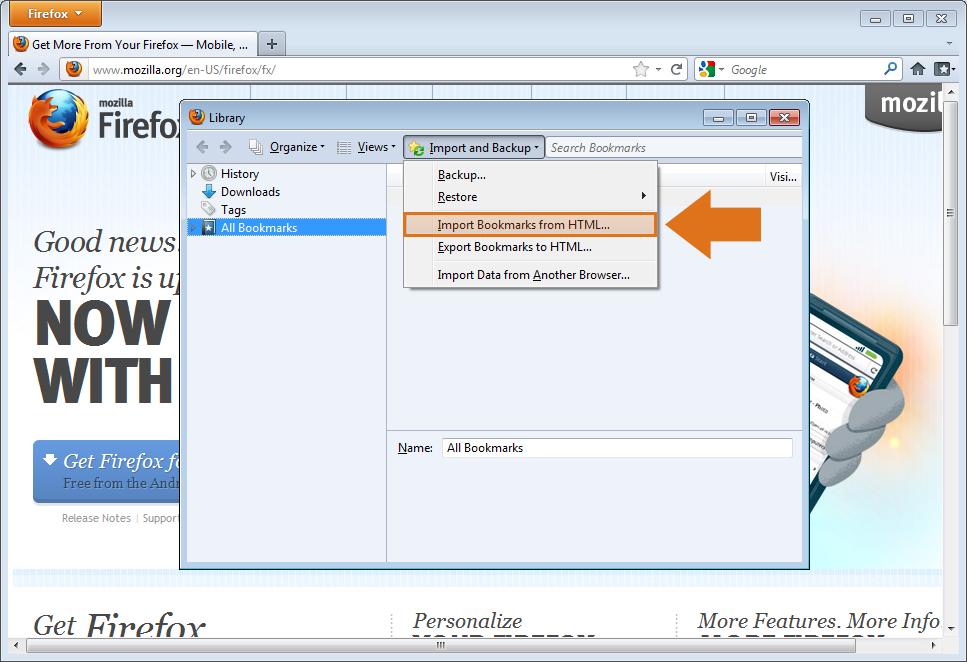
Once saved, you can back it up or import it to another Computer running Firefox with Password Exporter installed.


Some iPhone apps let you purchase extra content, upgrades, characters, expansions, and services within the apps themselves. Paying for these features from within iPhone applications is what is known as “In-App” purchasing. These types of content purchases are usually available most through iPhone games.

This can be a useful, easy and fun way to quickly get that power up or cheat to beat the level, but the reality is it can be a potentially dangerous feature as well. Some of applications aren’t really up front about the purchases and also make it really simple to accidentally purchase in-app content. Some In-App purchasing options can trick you into thinking its game currency and not real money, while others may continuously charge for purchases.

The scariest scenarios involve your children’s use of the games.  Horror stories of children using their parent’s iPhone’s to make huge In-App purchases without realizing what they were doing even sparked an investigation by the Federal Trade Commission in 2011. The initial complaint came from a parent whose 8 year old purchased $1400 worth of in-game content from the children’s app “Smurf’s Village”. The main argument is that software games designed to be played by children should not be selling In-App items that can cost close to a $100 each.

Fortunately Apple allows you to disable the In-App purchasing feature so you can rest easy as you play Angry Birds in the bathroom at work or your child plays Smurf’s Village at home. The same steps apply to all of Apple’s multi-touch products which include the iPhone, iPod Touch, and iPad. With a few easy taps you can make sure that your In-App purchases aren’t accidentally made by you, your wife/husband or your children.

Instructions

1. Go to your iPhone’s home screen. If your iPhone is off, turn on and slide to unlock, otherwise you can press the home button to get there.

2. Tap on the “Settings” app icon.

3. inside the “Settings” app, tap on “General”.

4. Scroll down until you see the label titled “Restrictions” and select it.

5. Tap the “Enable Restrictions” option.

6. Next you will be asked to enter a Passcode. The Passcode is a password that will lock, or “restrict” certain aspects and functions of an iPhone, iPod Touch, or iPad. You’ll need to reenter it to avoid typos.

7. Once the Passcode is set up, scroll down to the “Allowed Content” section.

8. Slide the in-app purchases slider to “Off”. Doing this will stop anyone who doesn’t know the Passcode from making in-app purchases.


Y U no open Firefox?

I cannot start Firefox on my Mac. It gives me the error message “A copy of Firefox is already open. Only one copy of Firefox can be open at a time.” I uninstalled the Firefox App and I have tried restarting the computer.

This also applies to the error message, “’Firefox is an application which was downloaded from the Internet. Are you sure you want to open it? Safari downloaded this file today at…”

Here’s how to fix:

Find and check the access properties for your Firefox Profile.

Whoa wait what?

Close Firefox Browser App.

Open Finder. On the sidebar in the Finder, locate and open your main Mackintosh HD.

Select user. That’s your user profile.

On the top menu for Finder, (that’s the menu bar on the top of the desktop screen that says File, Edit, View, Go, Window, Help – not on the Finder window). Select Go and then click on Library.

Click on Application Support and then remove the Firefox folder under the Application Support Directory.


You typed in three hyphens (—) in Microsoft Word and pressed Enter, and then it automatically changes into a horizontal line. Now you’re having trouble removing what you think is the horizontal rule <hr> tag from Microsoft Word. You couldn’t delete it with the backspace key or the delete key, and you couldn’t select and highlight it with the cursor.

The Problem:

This is actually an auto-format feature in Microsoft Word that creates a border for a document whenever you type in three hyphens (-) and press enter. This seemingly irremovable, instant horizontal line will also show up it you type in three underscores (_), three pound signs (#), three equal signs (=), or three tildes (~) in a row and press Enter.

How to Fix:

Microsoft Word 2003 (or earlier):

  1. Place your cursor above the horizontal line.
  2. From your menu, choose Format >> Borders and Shading >> None >> Ok

Microsoft Word 2007 (or 2010) Screenshots

  1. Place your cursor above the horizontal line.
  2. From the menu, click Page Layout.
  3. Once you’ve selected Page Layout, click on Page Borders.
  4. Select the Borders Tab.
  5. Select None, and then click Ok.


How to turn off the auto-format feature for borders:

You can fix it so that Microsoft Word won’t create the horizontal line borders. See screenshots below of how to shut off the auto-format feature.

Click on the auto-format lightning-bolt box near the newly created horizontal line:

Choose Control AutoFormat Options:

Uncheck the checkbox for Border Lines:

Click Ok and you’re finished!


Remove the horizontal line in Word 2007 (or 2010)

Step 1
Place your cursor above the horizontal line.

Step 2
From the menu, click Page Layout.


Step 3
Once you’ve selected Page Layout, click on Page Borders.


Step 4
Select the Borders Tab.


Step 5

Select None, and then click Ok.

 
Let me know in the comments below if this tutorial helped you out. I was so frustrated the first time this happened to me, but these steps helped me right through it.


Have you swapped out your old computer and became frustrated when you had to set up all of your bookmarks and favorites again on the new one? In Firefox 12.0 you can move your bookmarks quickly and easily. Learn how to Export bookmarks from Firefox 12.0 and then Import them onto a different Internet Browser. Follow these simple instructions to learn how.

Instructions

Exporting Firefox 12.0 Bookmarks

1. Open Mozilla Firefox 12.0 Internet browser.

2. Click the Bookmarks Menu Tab in the Menu Bar located on the top left of the browser. If you do not see the Bookmarks Menu Tab, press the ALT key on your keyboard and the menu will appear.

3. Click on “Show All Bookmarks” in the Bookmarks menu. You can also click “CTRL + Shift + B” on your keyboard. A new window will pop up on your desktop, titled “Library”.

4. Click on “Import and Backup”.

5. Select “Export Bookmarks to HTML…” A new window will open, titled “Export Bookmarks File”.

6. Save files onto custom flash drives or portable external hard drives. You can also save onto your folders if you’re transferring bookmarks between browsers on the same computer.

Importing Firefox 12.0 Bookmarks

If you are switching browsers or using a new computer, you will want to import your bookmarks. Follow these simple steps to learn how.

1. Repeat steps 1 – 4 from you new Internet browser from above.

2. Select “Import Bookmarks from HTML…” A new window will open, titled “Import Bookmarks File”.

3. Select from your computer your Imported Bookmarks File.

4. Click “Open”. The file will then automatically populate the new Internet browser.


Your bookmarks will now appear in your Firefox bookmarks menu. Reopen your Internet Browser and your ready to quick surf!

Now that you have learned how to import and export bookmarks in Firefox 12.0, check out our tutorial on importing & exporting favorites in Chrome and Internet Explorer.


So you’ve been using Firefox with no problems and then out of the blue one day you open Firefox from your desktop shortcut or taskbar and your homepage doesn’t come up and instead you get the last page you visited. This can be a big problem considering maybe you had your personal email or bank account still open without being signed out. It can also just be really, really annoying.

Here’s how to change it so that it goes to your Home Page every time you open Firefox.

Instructions

1.) Go to “Tools”.

2.) Select “Options”. The options windows will pop up.

3.) On the top menu, click on “General”.

4.)  Locate “When Firefox starts:” Click on the drop down menu next to it.

5.) Select “Show my home page”.

6.) Press “OK” and you’re done! Try restarting Firefox and breath a huge sigh of relief when it opens to your home page.


The autocomplete feature is a very useful and efficient tool to use when browsing the web. As you type in the first few letters of a web address, Firefox will suggest one web address that matches. You can type in additional letters until you see the web address you want and press Enterto go there. In this tutorial we’ll show you how to set Firefox to fill in automatically while you’re typing a web address.

  • Open Mozilla Firefox Internet Browser.
  • In the Location bar, type about:config and press Enter. This will redirect you to a warning page that says This might void your warranty!
  • Click the button that says I’ll be careful, I promise! to continue to the about:config page.
  • Type the preference name, browser.urlbar.autoFill in the Search field located at the top of the page.
  • Change the value of this preference to true. To do this, simply double-click where you see the preference name browser.urlbar.autoFill. To turn off, double-click the preference name to change its value to false.
  • Close the browser.
  • Reopen Firefox and type in a web address to try out. Once you see the address you’re looking for, stop typing and press Enter. This saves time and works great!


Mozilla Firefox took the App Tabs concept and incorporated it into another really great feature they call, ‘Tab Groups’ also known as Panorama. Now Tab Groups allows you to visually group related tabs into clusters and then lets you switch between them and quickly search through all your various tabs. You can navigate through dozens of tabs in little to no time.

This is NOT to be confused with Internet Explorer Tab Groups. That… that would just be wrong.


Why you should use Tab Groups

If you have enough tabs that it’s borderline ridiculous, then Tab groups might just be for you. If you’re regularly ending up with more tabs than fit on the Tab Strip, then Tab groups could be right up your alley. If you’re constantly going a hundred miles a second on the internet to get through your crazy work day, then you’d better listen up.


How to Create a Tab Group / How to Navigate through Tab Groups

You should already have a number of tabs to work with but if you don’t, go ahead and open a few now.

1.) Enter the Tab Groups view by clicking the List All Tabs button at the far right of the Tab Strip. It doesn’t say ‘All Tabs’ so look for the button with an arrow in the middle pointing down. Press Ctrl + Shift + E for the shortcut.

2.) When you enter the Tab Groups view for the first time, you’ll see thumbnail previews of all of your tabs in one group. To make a new group, simply drag one tab out of the group and then drag a second one on top of it. A box will be drawn around them.

3.) When you are done, just click on a tab to exit the view. You will be returned to Firefox, the tab you clicked on will be active and only the tabs in that group will be visible.

4.) Click on a tab in the group you want to switch to and you’ll exit the view and be returned to Firefox. The tab you clicked on will be active and only the tabs in that group will be visible.

5.) Click the search button on the right side of the window to bring up the search box and then just begin typing the name of the tab you’re trying to find.

6.) As you type, the tabs that match your search will be highlighted. Just click on a tab to select it and be returned to Firefox.


Yeah I'd rather stick with Firefox


App Tabs is a cool feature by Mozilla Firefox that lets you always keep your most visited web sites like Facebook, Twitter and Gmail open in miniature tabs. Apps tabs open automatically each time you launch Firefox and can’t be closed by accident. In this tutorial we will show you how to make and use Firefox App Tabs.

Why you should use App Tabs

Firefox App Tabs allow you to pint any website to the left side of the Tab Strip so that it’s always available, loaded, and ready. In this way, you can receive notifications from websites like Twitter, Facebook, and Gmail without even breaking a sweat. It helps too if you’re like me and periodically late to work (almost every day) and need your company’s clock in website open and ready when you launch the internet browser.

Or it could just save you the refresh…

Typical day at the office


How to make an App Tab

Right-click on the tab you want to keep as an App Tab and select Pin as App Tab from the menu.


How is App Tabs different than a regular tab or a bookmark?

- App Tabs don’t have a close button so they are always open and you can’t close them by accident.

- They notify you with a blue highlight when you receive new data on the site like an email, comment or message.

- All the App Tabs will automatically launch each time you launch Firefox, so you don’t have to wait for it to load like a bookmark.

- When you open a link in App Tabs, it’ll automatically open in a new tab so your App Tabs stay on the same page.

- App Tabs are smaller and out of the way.


Mozilla Firefox provides useful, customizable toolbars that provide easy access to common features and sites. In this tutorial we’ll show you how to create, and add your own custom toolbar to Firefox. This is a great way to fully personalize your browser and make things more efficient when you surf the web.

  • Open the Mozilla Firefox Internet Browser. On the top, you’ll notice a menu bar that says File, Edit, History, Bookmarks, Tools and Help. Next to that is an empty section known as the Tab Strip.
  • Right-click the Tab Strip and select Customize. A window titled Customize Toolbar will pop up.
  • Click Add New Toolbar. A small window titled New Toolbar will then pop up.
  • Enter a name for your new toolbar and then click OK.
  • Customize your toolbar by adding items from the Customize Toolbar window. Firefox will not create your toolbar unless you add at least one of these items. Once you’re finished, click Done. Your new toolbar will then appear below the Navigation Toolbar.
© 2011 Suffusion theme by Sayontan Sinha
WordPress SEO fine-tune by Meta SEO Pack from Poradnik Webmastera