Have you swapped out your old computer and became frustrated when you had to set up all of your bookmarks and favorites again on the new one? In Firefox 12.0 you can move your bookmarks quickly and easily. Learn how to Export bookmarks from Firefox 12.0 and then Import them onto a different Internet Browser. Follow these simple instructions to learn how.

Instructions

Exporting Firefox 12.0 Bookmarks

1. Open Mozilla Firefox 12.0 Internet browser.

2. Click the Bookmarks Menu Tab in the Menu Bar located on the top left of the browser. If you do not see the Bookmarks Menu Tab, press the ALT key on your keyboard and the menu will appear.

3. Click on “Show All Bookmarks” in the Bookmarks menu. You can also click “CTRL + Shift + B” on your keyboard. A new window will pop up on your desktop, titled “Library”.

4. Click on “Import and Backup”.

5. Select “Export Bookmarks to HTML…” A new window will open, titled “Export Bookmarks File”.

6. Save files onto custom flash drives or portable external hard drives. You can also save onto your folders if you’re transferring bookmarks between browsers on the same computer.

Importing Firefox 12.0 Bookmarks

If you are switching browsers or using a new computer, you will want to import your bookmarks. Follow these simple steps to learn how.

1. Repeat steps 1 – 4 from you new Internet browser from above.

2. Select “Import Bookmarks from HTML…” A new window will open, titled “Import Bookmarks File”.

3. Select from your computer your Imported Bookmarks File.

4. Click “Open”. The file will then automatically populate the new Internet browser.


Your bookmarks will now appear in your Firefox bookmarks menu. Reopen your Internet Browser and your ready to quick surf!

Now that you have learned how to import and export bookmarks in Firefox 12.0, check out our tutorial on importing & exporting favorites in Chrome and Internet Explorer.


Importing and Exporting Firefox 10.0 Bookmarks

Export Bookmarks from Firefox 10.0 and Import them onto a different Internet Browser or Computer.

Have you ever changed computers and became frustrated when you had to set up all your favorites again? In Firefox 10.0 you can move your bookmarks quickly and easily. Follow these  steps below to learn how.

  1. Open Mozilla Firefox 10.0 Internet browser.
  2. Click the Bookmarks Menu Tab in the Menu Bar located on the top left of the browser. If you do not see the Bookmarks Menu Tab, press the ALT key on your keyboard and the menu will appear.

    Click to enlarge

  3. Click on the “Organize Bookmarks…” option in the Bookmarks menu. As an alternative, click “CTRL + Shift + O” on your keyboard. A new window will pop up on your desktop, titled “Library”.
  4. Click on the “ Import and Backup” Drop Menu from the Library Menu Bar located on the top of the window.

    Click to enlarge...

  5. Click on the “Export HTML” option. A new window will open, titled “Export Bookmarks File”.
  6. Save file onto a USB Flash Drive or a Portable External Hard Drive. You can also save onto your  folders if you’re transferring bookmarks between browsers on the same computer.


Importing Firefox 10.0 Bookmarks

If you are switching browsers or using a new computer, you will want to import your bookmarks. Follow these simple steps to learn how.

  1. Repeat steps 1 – 4 from you new Internet browser from above.

    Click to enlarge

  2. Click on the “Import HTML” option. A new window will open, titled “Import Wizard: Import Settings and Data”.

    Click to enlarge...

  3. Click “Next” on the bottom right of the window.
  4. Select from your computer your Imported Bookmarks File. The file will then automatically populate the new Internet browser.
  5. Reopen your Internet Browser and your ready to quick surf!


Now that you have learned how to import and export bookmarks in Firefox 10, check out our tutorial on importing & exporting favorites in Chrome and Internet Explorer.


For bookmark instructions for the most recent Firefox version, check out our latest guide: Firefox 11 Bookmarks


FF9 Bookmarks


Exporting Firefox 9.0 Favorites

Learn to export bookmarks from Firefox 9.0 to use with a different browser or on a different computer.

The first step is to find the Bookmarks menu in the Menu bar towards the top of the screen.  If the Menu bar is missing and you do not see a Bookmarks menu, pressing the alt key on your keyboard will make the  menu appear. To enable the menu permanently, you can go to View > Toolbars and check the Menu Bar option.

When you have located the Bookmarks menu, click on “show all bookmarks” in that menu.

Click to enlarge

Now a new window will open, titled “library”. Look for the “Import and Backup” menu at the top of this window. Click this button and choose “Export bookmarks to HTML”

Next you will be given the chance to choose where you want to save your bookmark file. I usually save mine to a USB drive, so that I can import my bookmarks on any computer at any time. You can save your file wherever is convenient for you.

Click to enlarge...

Importing Firefox 9.0 Bookmarks

If you are switching browsers or using a new computer, you will want to import your bookmarks. Follow these simple steps to learn how.

Just like in the steps to export your bookmarks, we will first need to locate the Bookmarks menu at the top of the Firefox window. If you do not see the menu bar with the bookmarks menu, press the alt button on your keyboard.

Select “show all bookmarks” from the bookmarks menu.

Click to enlarge


The Firefox library window will open.  Click the Import and Backup button towards the top of the window, and select “Import bookmarks from HTML”.

The final step is to select the backup file you exported from your old browser and Firefox will import them all into the current list of favorites.

Click to enlarge...

Now that you have learned about bookmarks in Firefox 9, check out our tutorial on importing & exporting favorites in Chrome and Internet Explorer.


Ever since I first got a phone capable of browsing the world wide web, I’ve always thought there was something lacking from the experience. Typing on a number pad, viewing websites on phone screens with strange resolutions, no Flash support. Over the last few years many of these problems have been addressed. Most phones now have full keyboards, mobile websites have set standards that most mobile devices follow, some phones even support Flash these days! (Not my iPhone, of course ಠ_ಠ ) With all these improvements, it is only natural, I suppose, that our home internet begins merging with our mobile internet. To truly make the transition from laptop, to phone, to work computer seamless, Firefox creator, Mozilla, has made Firefox Home. Have you ever looked something up online before leaving your house, and then not being able to find it again? That will not be an issue if you have Firefox Home as it syncs your browser at home, with the one in your phone. Now when you leave the house, the tabs you had open on your PC are still open on your phone. Something you bookmarked at work is now easily accessible at home. I imagine the benefits of this integration are already clear to you, so let’s move on to how to get it done:


Installing and Configuring Firefox Home

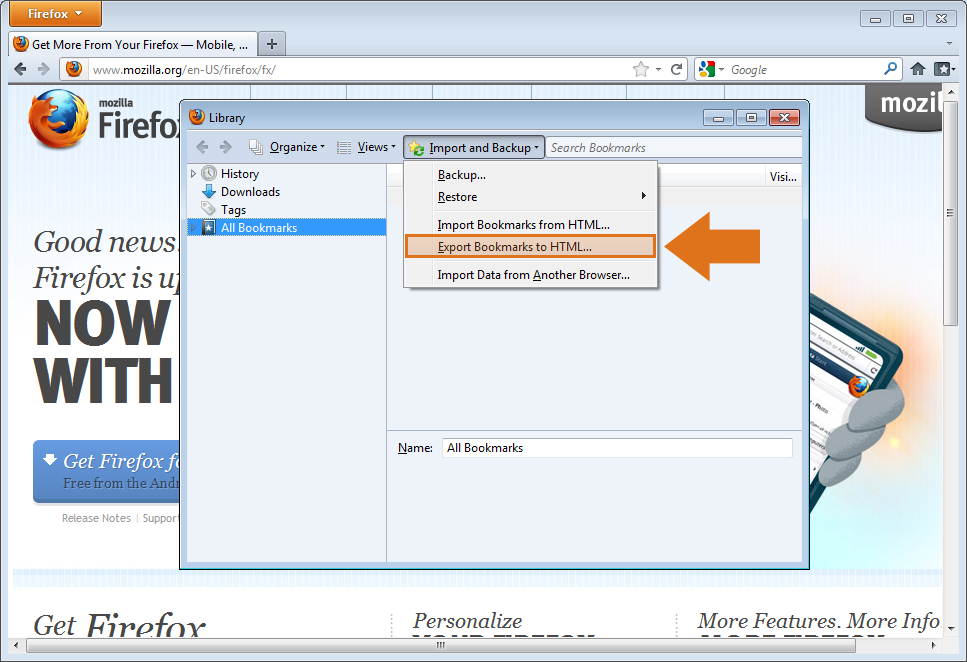
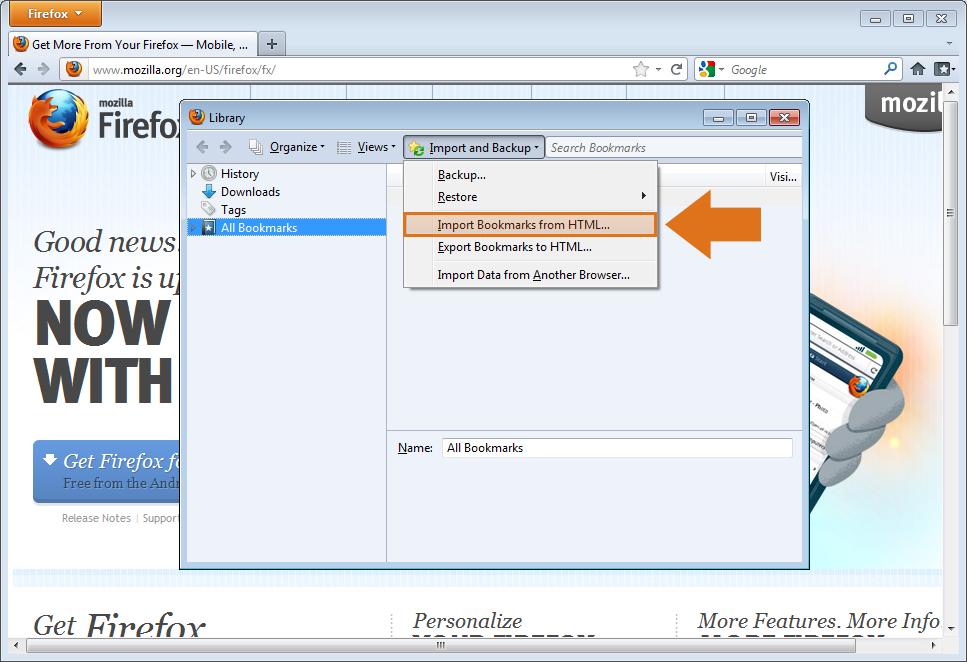
You will need to be using Firefox on the computers you want to sync with Firefox Home. I hope this was obvious. If it wasn’t, Click Here, for the download. If Firefox wasn’t your default browser, you might want to import your bookmarks. Luckily I’ve recently wrote a tutorial for that too: Import your bookmarks into firefox

Now that you’ve got Firefox installed, you need to get the Firefox Home app for your phone. I have an iPhone so that’s what I’ll use for these instructions.

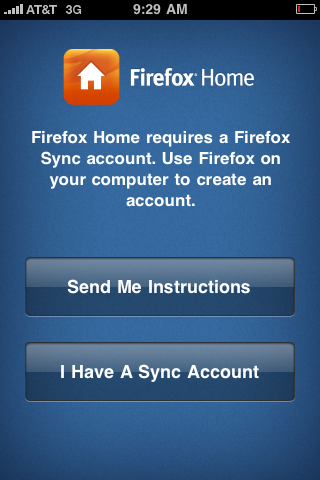
Start by going to the app store on your phone, and downloading Firefox Home. You can find it easily by typing firefox into the search. Allow the app to install. Once you start the app, you will be asked if you already have a sync account, or if you’d like to receive instructions on creating one. You can forgo the the instructions, since I will be outlining them here.


At this point, put your phone aside and open Firefox on your computer. Click the Tools menu from the Menu bar and select “options” at the very bottom of the menu.


Select the “Sync” tab at the top of the options window, then click on “Set Up Firefox Sync”. Click OK.

At the next prompt, click the “Create a New Account” button.

Enter your account details on this next page. Note the options button on the bottom left. Clicking here will allow you to choose what is shared between devices with Firefox Home. By default everything is shared, feel free to customize this to your needs. Once you have filled out all the fields, click Next.

Firefox will create a unique code for you to sync to other computers. Save this code somewhere safe. You will also have the option to print the code. Once you have saved your encryption code, click Next.

Next you will be asked to fill out a Re-Captcha to verify you are human. Type in the text, and click Next.

So far so good, you’ve finished creating your account. Now to set it up on your devices.

When you click finish you will be taken back to the sync tab in the options menu. There will now be an option to “add a device”. This is the next step.

The next screen will ask you to enter a code that the device provides. Take out your phone and start up the Firefox Home app. Select the “I have a sync account” option and your phone will provide a 12 character code split into 3 lines. Type this code into the computer and click next.


That’s it! Your phone is now synced with your computer browser. You can add multiple devices to Firefox home (such as your iPhone and iPad) or multiple computer (such as your home and work computer). Enjoy your cross-platform browsing!


© 2011 Suffusion theme by Sayontan Sinha
WordPress SEO fine-tune by Meta SEO Pack from Poradnik Webmastera