Mozilla Firefox’s Web Developer menu has tools for inspecting internet pages, running JavaScript code, and viewing HTTP requests and other relevant messages. In this tutorial you’ll learn about Firefox’s all-new Inspector tool and updated Scratchpad.

Mozilla Firefox’s new web developer features, combined with top of the line Firefox web developer addons like Firebug and Web Developer Toolbar, make Mozilla Firefox the ideal internet browser for web developers. All of these tools are available absolutely for free under Web Developer in Firefox’s menu.


Page Inspector

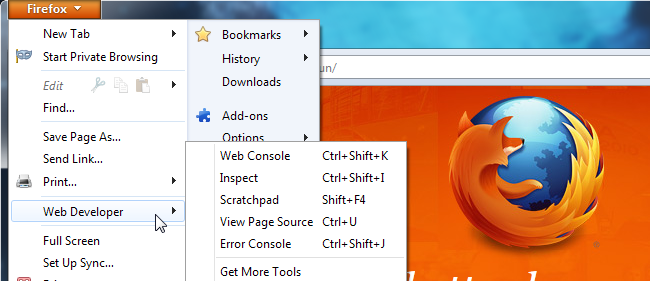
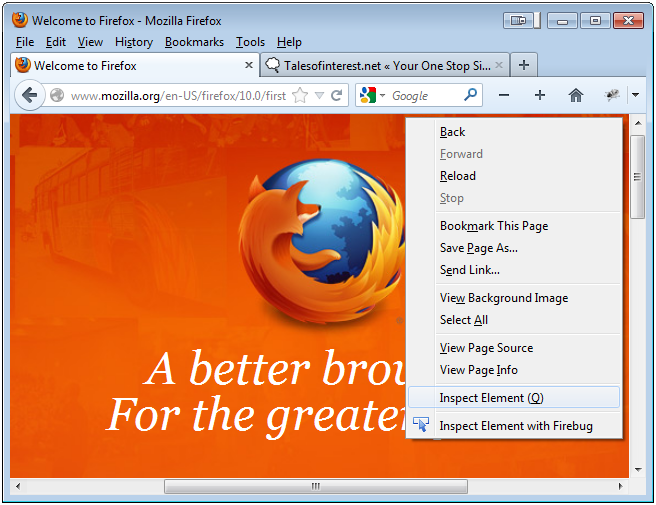
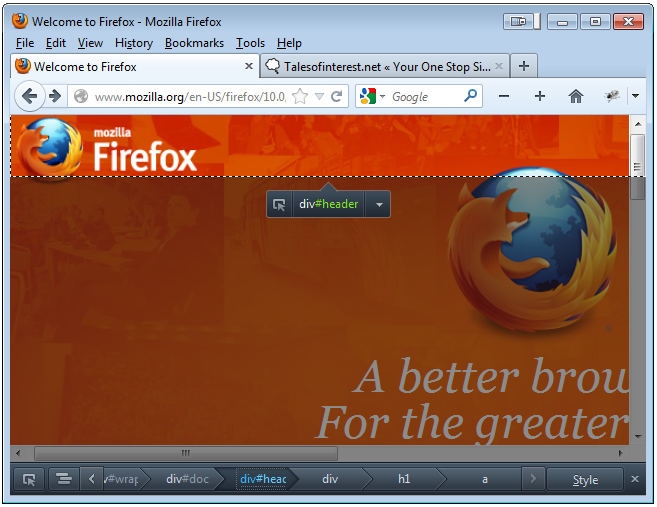
You can inspect a specific element’s code by right-clicking it and selecting Inspect (or by pressing Q on your keyboard). You can also launch the Inspector right from the Web Developer menu.

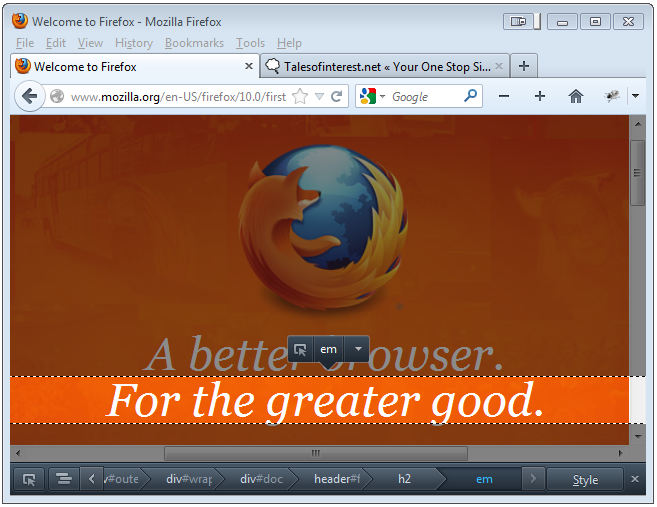
You will then see a toolbar at the bottom of the webpage, which you can then use to control the Inspector and check out all the elements on the page. Your selected element will be highlighted and other elements on the webpage will be dimmed out.

If you want to select a new element on the page, click the Inspect button on the toolbar, hover your mouse over the page and click you element. Mozilla Firefox will then highlight the element under your cursor as you maneuver it across the page.

You can also go back and forth between parent and child code elements by clicking the breadcrumbs on the Inspector toolbar.

HTML Inspector

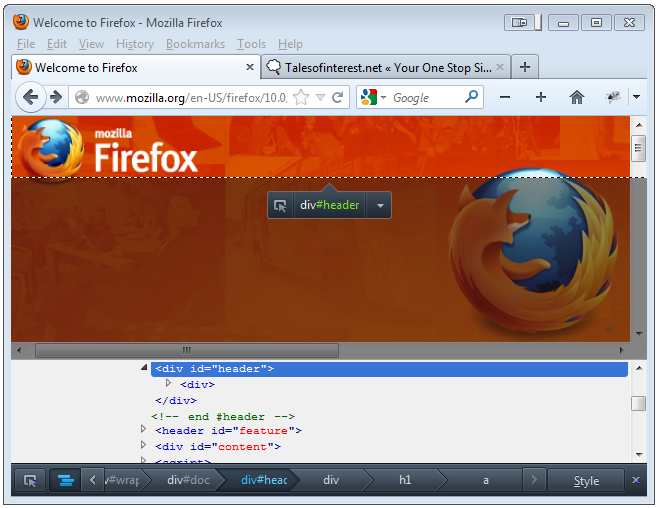
Click on the HTML button to view the HTML code of your selected element.

The HTML Inspector will allow you to expand and collapse the HTML tags, making it easy to visualize your changes right on the page – very similar to WYSIWYG software like Adobe Dreamweaver.

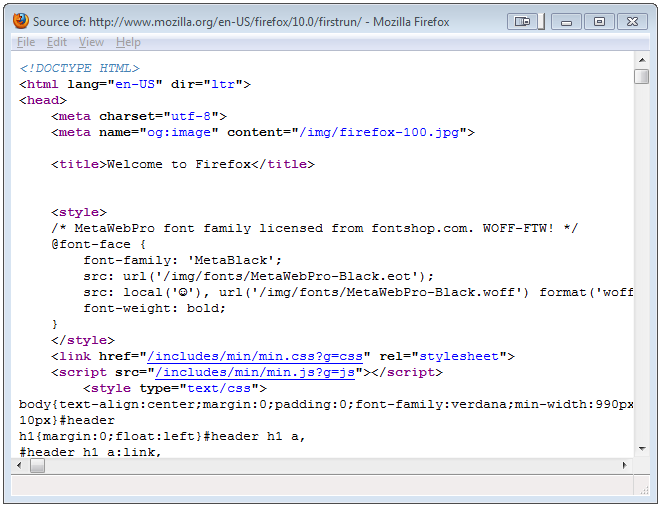
If you want to see the webpage’s HTML in a flat file, you can also select View Page Source from the Web Developer Menu. (Remember to bring up the Web Developer Menu just use your cursor to right-click anywhere on the webpage).

CSS Inspector

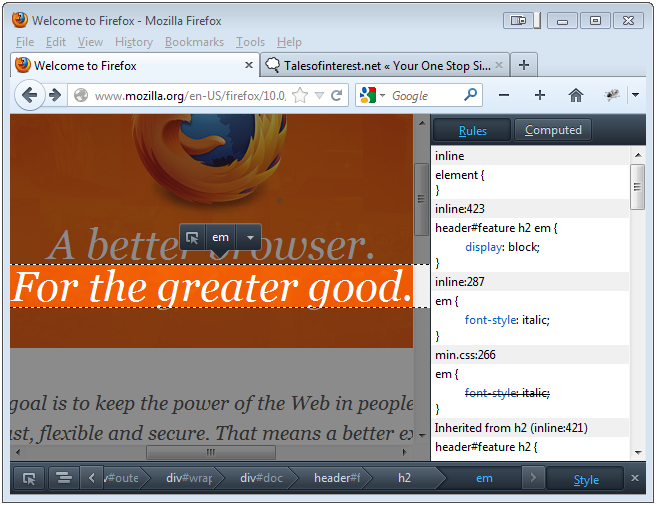
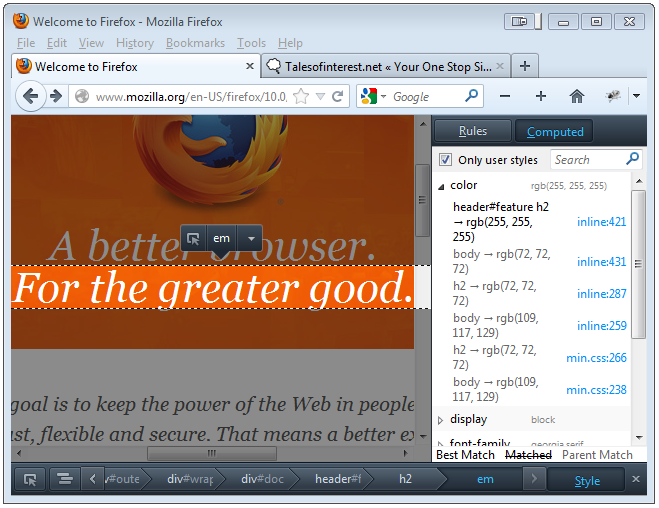
Click on the Style button to see the CSS rules that are being applied to the selected element and there’s also a CSS Computed panel.

You can switch between Rules and Computed by clicking the Rules and Computed buttons. To help you find specific CSS properties, the computed panel includes a search box.

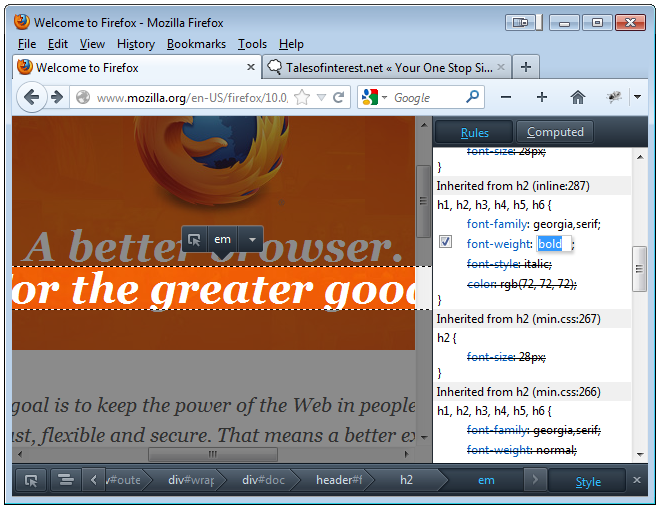
You can also edit the element’s CSS straight from the Rule panel. Uncheck any of the check boxes to temporarily deactivate the rule, click the text to change a rule, or add your own rules to the element at the top of the panel. Here, we’ve added the font-weight: bold CSS rule, making the element’s text bold.

JavaScript Scratchpad

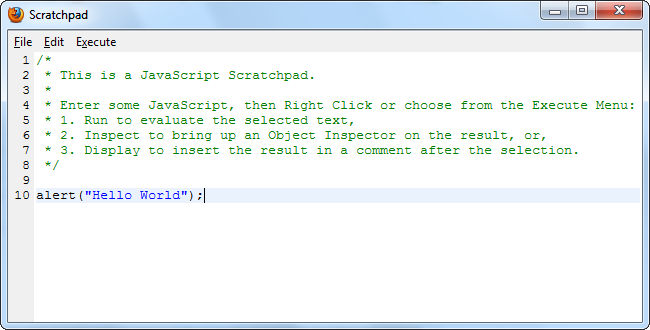
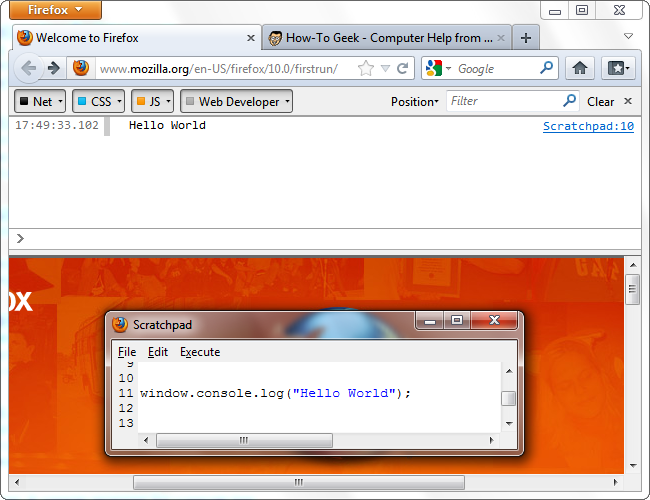
The Scratchpad also saw an update with recent versions of Firefox, and it now contains syntax highlighting. You can type in JavaScript code to run on the current webpage.

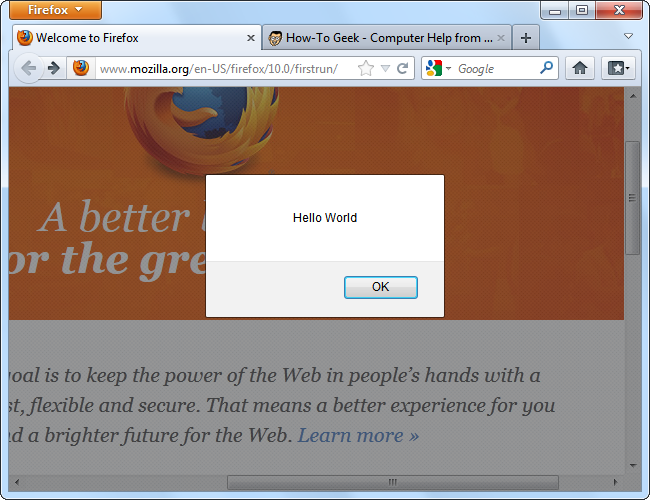
As soon as you have, click the Execute menu and then select Run. The code runs in the current tab.

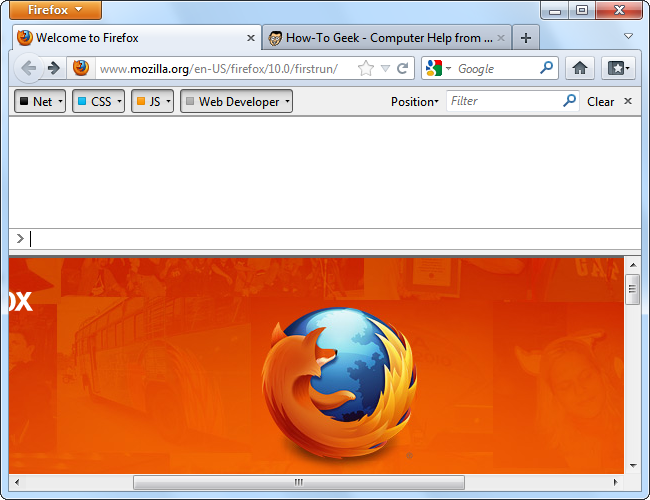
Web Console

The new Firefox Web Console replaced the old Error Console, which has been belittled by users and removed by Mozilla developers in the latest versions of Firefox.

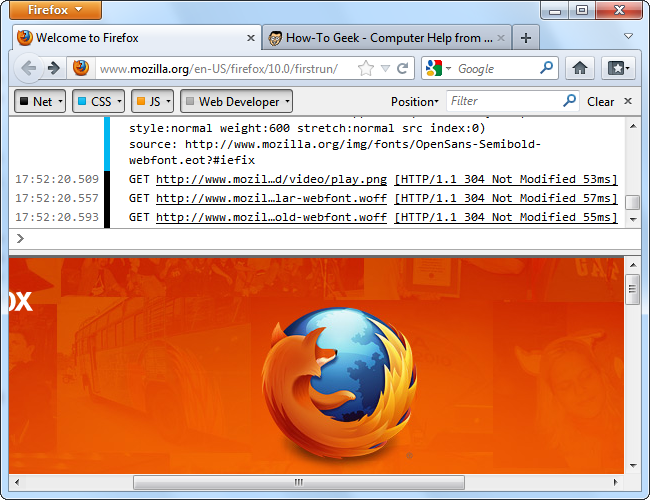
The Web Console displays 4 different types of messages, which you can then toggle the visibility of – network request, CSS error messages, JavaScript error messages and web developer messages.

A web developer message is a notification printed to the window.console object. For example, you could run the window.console.log (“Hello World”); Javascript code in the Scratchpad to print a developer message to the console. Web developers can integrate these messages into their JavaScript code to help with debugging.

Refresh the webpage and you then see the generated network requests and other related messages.

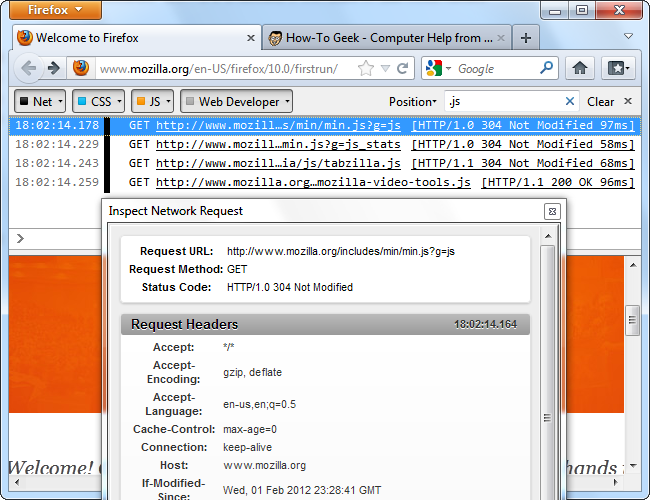
Use the search box to filter the messages; click a request if you want to see more details.

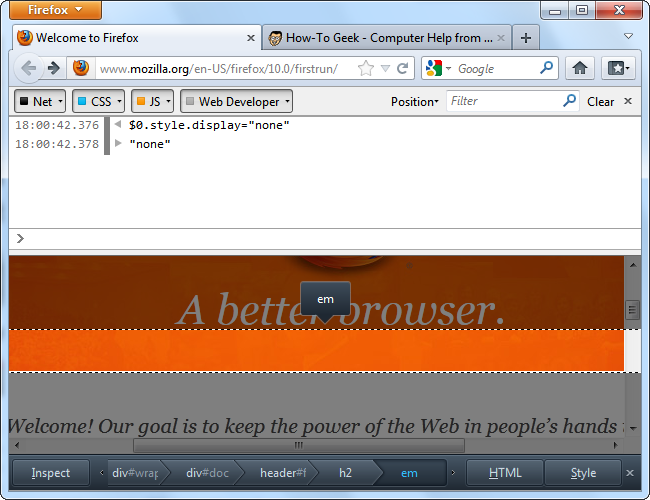
With recent versions of Firefox, the Web Console can work in tandem with the Page Inspector. The $0 variable stands for the currently selected object in the Firefox Inspector. So, for example, if we wanted to hide the currently selected object, you could run $0.style.display=”none” in the console.

If you are interested in learning more about using the Web Console and its various built-in functions, check out the Web Console page on Mozilla’s Developer Network website.


The best computer for digital photographers maximizes performance and storage capacity while simplifying workflow.

So what do I mean when I say photographers? Well you should probably love taking photos for one. You most likely carry your professional camera along wherever you go – just in case. You’re always on the lookout for brand new Photoshop filters or useful editing applications and you upload tons of photos a year on Flickr or your other image hosting accounts.

If that sounds a lot like you then I’ll be showing you how to choose a computer that is responsive and fast for editing, storing and displaying your photos.

Whether you decide to build your own computer or purchase one already built, there are quite a few things to consider that are essential to choosing the best components for what is considered a “photographer’s” computer. You definitely want great storage capacity, a high performing CPU and graphics card, and finally a good monitor.

Every Photographer is Different

All photographers have varying shooting styles, workflow needs, and attitudes towards photo editing. Right now I’m working with a Sony Alpha NEX-7, and I shoot almost exclusively in raw image mode.

Raw image format captures the pure sensor data on a DSLR camera, issuing no compression or modification on the data it collects. That basically means large files, and a image editor that plays nice with Sony’s raw format.

Whatever camera you use, a good computer for editing a storing digital photos will have a few common elements. Photo editing, especially involving HDR and noise reduction effects, requires excellent CPU performance. If you’re going to save most of your photos, you’ll need a large storage capacity. If you’re editing large raw photos, more memory will help. Don’t forget about getting a good monitor too to display your images as clearly as possible.

Graphics Card (GPU)

Graphics cards don’t only serve to speed up your display and scroll the canvas, but they also act as a parallel compute engine for a number of powerful editing filters, especially blur filters.

Photo editing programs are rapidly incorporating GPU acceleration into their system. Most of these programs use OpenGL and OpenCL, two main software programming standards. OpenGL is mostly for graphics, while OpenCL lets software developers use the GPU for generic parallel compute tasks, such as blur filters mentioned before.

Just to give you an idea, the popular Photoshop CS6 utilizes both OpenGL and OpenCL, while Corel AfterShot Pro uses the graphics card to help in file-format conversion. Programmers have also built an entire photo-editing software called MuseMage that primarily uses GPU acceleration.

With that in mind, you don’t really need a premium $400 and up graphics card to run with your photo editing. If you’re not playing any PC games as well on the computer, then you’ll be fine with a mid-range GPU.  You can find an AMD Radeon HD 7770 for around $200. Or if you want something with a little more oomph, an AMD Radeon 7850 will cost your around $250, and it can hold its own with PC gaming too.

Nvidia GPUs will work good too, but I’d suggest going with AMD more because they enabled their OpenCL drivers. Remember that OpenCL is the programming standard for graphics compute tasks, such as Photoshop blur filters. But that could very well be incorporated into Nvidia graphics cards sometime in the future.

CPU and Memory

As a basic recommendation, I’d suggest the Intel Core i7-3930K CPU. The 3930K CPU contains 6 cores, can execute 12 simultaneous threads, and is built on Intel’s 32nm manufacturing process. That might be a little much for some users, so a good alternative is the Core i7-3770K, which is part of Intel’s new Ivy Bridge line processors.

Running at 3.5GHz, the Core i7-3770K runs 4 cores and up to 8 threads. It’s very power efficient and costs around $350. I recommend the Intel Core i7 processors because they support Hyper-Threading in addition to offering large L3 caches, which improves performance in most photo editing software.

As for the memory, if your editing plenty of raw images, I’d recommend 16GB of RAM, since 14-bit raw images range from 45MB to 48MB each, and consume a lot more memory during editing. Besides, today’s memory prices are pretty low anyway so I’d recommended going as high as possible.

Storage

If you’re shooting tons of raw images, you’ll definitely want tons of storage. You may not be using the Sony Alpha NEX-7, but even 12 megapixel raw images take up at least 10MB of disk space each, while 12-bit, 16 megapixel images consume 14MB to 16MB each.

Now when it comes to storage on your photographer computer, don’t save images on the boot drive if you can work around it. At the very minimum, I’d recommend using two drives on your computer. A great combo would include an solid-state drive (SSD) for a boot drive and a large capacity hard disk drive (HDD) as secondary storage. Even if you’re running an HDD as your boot drive, having two physical drives will always improve overall system performance.

Monitors

A good monitor for a photographer’s computer can be calibrated to be color-accurate. No display is perfect, but some offer far better color fidelity than its counterparts. In general, I’d recommend using high-quality monitors with IPS or IPS-based LCD technology.

Unless you’re working on professional level photo work, you won’t really need a premium monitor, but you still definitely want a display that will support true 8-bits-per-pixel color. You can find good-quality 24-inch IPS monitors supporting 1920-by-1200-pixel resolution for under $400.


To Benchmark means to evaluate your PC’s performance using multiple tools and utilities specifically designed to analyze each major component.

In this tutorial, we will show you which programs are best, and draw out how to get results that are both reliable and repeatable, and explain how everything is calculated.

Running a Benchmark on your computer allows you to evaluate its performance, identify potential bottlenecks and choose the right system upgrades. Although general CPU and memory upgrades may help in some situations, it often makes more sense to upgrade the storage subsystem or the graphics board if you’re looking for perceptible improvement in system responsiveness or gaming performance.

If you ran a number of Benchmarks and identified which components were holding your system back, you would be able to choose the most effective upgrade for your current system.

There are a number of different kinds of Benchmarks available for evaluating a system’s performance. Some use synthetic tests that don’t really reflect real-world usage, while others use scripted tests that rely on actually applications and simulated real-world workloads. There are some Benchmarks that assess the performance of a single computer component, while others calculate total system performance. To best determine the overall performance of a PC, try running a combination of these Benchmarks, based on your usage patterns.

Individual Component Benchmarking

There are many components in a computer systems that contribute to its overall performance, but the CPU, memory, GPU, and storage configuration generally have the biggest impact. Deciding on which components are most important for you to consider depend mainly on what you’re using your PC for. A casual user who wants a more responsive PC would benefit from upgrading a slower hard disk drive to a fast solid state drive. A gamer who wants the best frame rate would probably be better off with a faster GPU than memory. It’s up to you which aspects of system performance are most important to you.

CPU

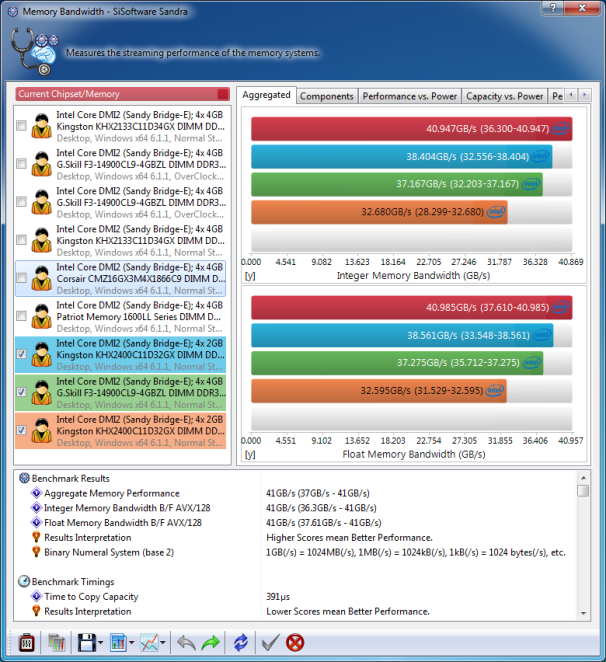
The best CPU Benchmarks put a heavy amount of stress on the CPU while it minimizes the influence of other system components. SiSoft’s SANDRA 2012 uses a few CPU-centric synthetic benchmarks that test a chip’s performance with various mathematical workloads. The tests are multithreaded and generally scale with higher-clocked speeds and more CPU cores. SANDRA also provides results from other CPUs for easy comparison.

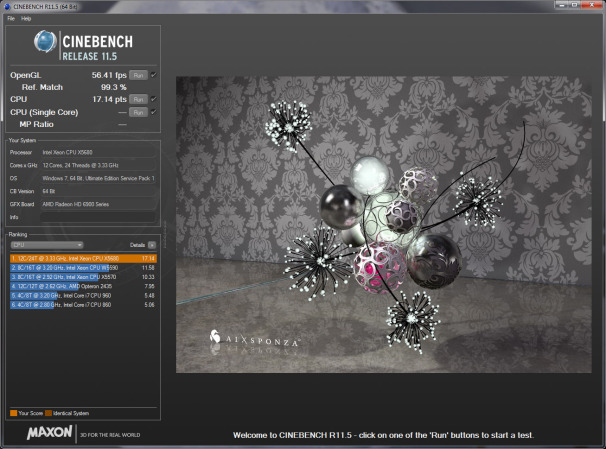
Another great benchmark for your CPU is Cinebench. Cinebench renders a 3D scene using the animation engine from Maxon’s Cinema 4D. Cinebench is free, works with multiple operating systems, and can run in single-threaded mode (to test the performance of a single CPU core) or in multithreaded mode (to tax all of the cores in a CPU). If all is working properly, an Intel Core i7-2700K will score about 1.55 in Cinebench’s (R11.5) single-threaded test and about 7.05 in its multithreaded test.

GPU

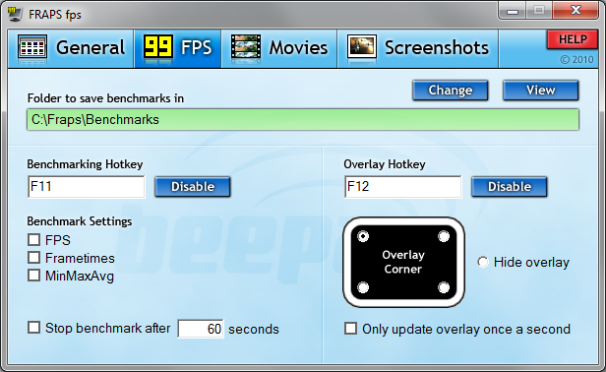
Myriad graphics-related benchmarks are available for testing a GPU’s performance. Many games have built-in tools to test performance; and you can test games that don’t with a utility called Fraps that shows real-time frame rates and tracks performance over time. Many synthetic and “canned” graphics benchmarks don’t use actual game engines to test performance, but produce comparable results anyway.

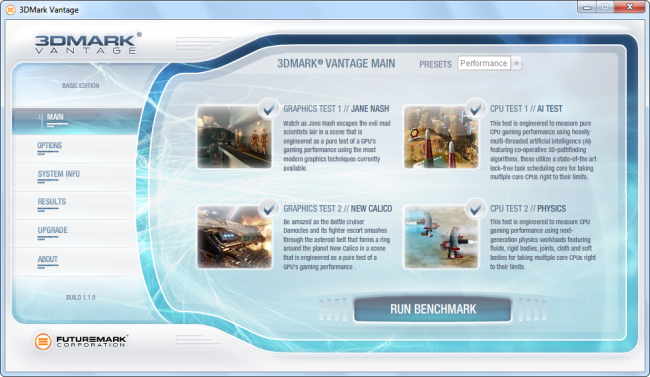
To test a GPU’s performance, we recommend using a mixture of synthetic and real-world tests to see how the GPU handles a range of different workloads. Futuremark’s 3DMark 7 is a popular program that provides an overall 3DMark score, as well as numerical results for each of the individual tests that contribute to the final score.

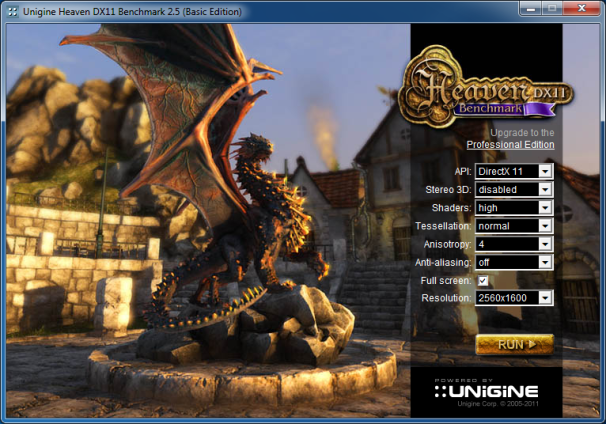
Another handy synthetic benchmark is Unigine Heaven. Heaven can test a GPU’s performance using DirectX 9, 10, or 11 or OpenGL paths, with varying levels of image quality and tessellation. Heaven’s results identify both an overall score and a frame rate.

In a system powered by an Intel Core i7-3960X, when tested at a resolution of 1920 by 1200 with 4X MSAA, 16X anisotropic filtering, and high tessellation, an Nvidia GeForce GTX 560 Ti will score about 665 points in Unigine Heaven, at about 26.4 frames per second. At the same settings, a Radeon HD 7850 will score about 706 points, at 28 fps. If you have a faster GPU than those cited here, your system should be able to beat these scores, but a slower GPU won’t be able to catch them.

Memory

The most common method of evaluating memory performance is through synthetic tests designed to ascertain peak bandwidth and latency. Performance variables include the operating frequency and capacity of the memory, and the number of channels that a given system uses.

AIDA64 Extreme Edition has a great built-in memory benchmark that tests read, write, and copy bandwidth, as well as latency; but it is available only as a limited trial unless you pay for the full edition of the tool.

The free edition of SiSoft SANDRA 2012 offers memory bandwidth and latency tests, too. It reports bandwidth scores in gigabytes per second (GBps) and latency in nanoseconds. The tests are easy to run and take moments to complete. An Intel Core i7-2700K-based system with 8GB of DDR3-1333MHz system memory running in a dual-channel configuration (two memory sticks) should offer about 16 GBps of bandwidth at an access latency in the 29ns range. Higher clocked memory should deliver more bandwidth and lower latency.

Storage

To test the performance of a hard drive or solid-state drive correctly, use a benchmark that analyzes read and write transfer speeds (with both sequential and random workloads), as well as access latency. Trace-based tests, like those used in PCMark, that track performance over time with simulated application workloads are also very useful.

One of the better free tools available for testing a drive’s performance is CrystalDiskMark. This benchmark is really useful because it tests both sequential and random read and write speeds with both large and small block sizes, and with queue depths of up to 32.

CrystalDiskMark doesn’t report access latency, however, so it’s a good idea to use a tool such as HD Tune, IOMeter, or the Physical Disk Benchmark in SiSoft SANDRA 2012 to do that.

Benchmarking your entire system

Among total system benchmarks, the rather basic Windows Experience Index (WEI) built into Windows 7 and Vista isn’t a good choice, owing to the rudimentary nature of the tests and the lack of granularity in the results. Instead consider using a suite such as BAPCO’s Sysmark or Futuremark’s PCMark 7; both are widely accepted and generate extensive results. Sysmark is expensive and tends to be difficult to run, however, whereas PCMark 7 is available in a free basic edition and can be run with a single click.

PCMark 7 runs a wide range of tests that tax CPU, GPU, memory, and disk performance; and it generates scores for each test–with higher scores reflecting better performance. PCMark 7 tends to emphasize disk/storage performance, but we’re fine with that. Upgrading from a hard drive to a solid state drive tends to be one of the best upgrades a user can make to improve system responsiveness, and PCMark 7′s results reflect that.

To give you a baseline for comparison, an Intel Core i7-2700K-based system with 8GB of RAM, a discrete Nvidia GeForce GTX 280 graphics card, and a 7200-rpm hard drive will earn a PCMark score of roughly 3800. Upgrade that same system with an SSD, and its score will jump to about 5100.

Prime95

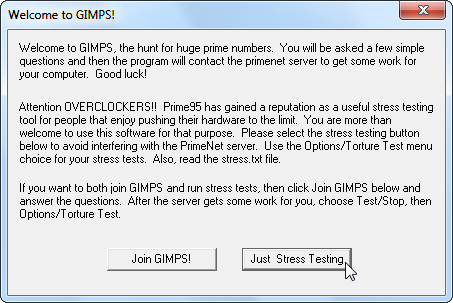
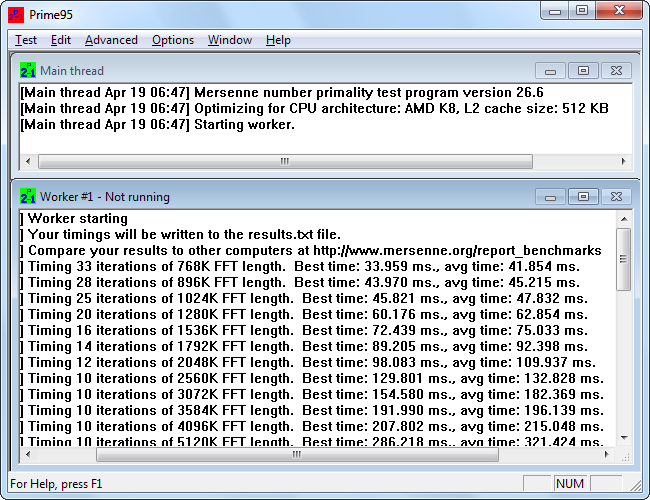
Prime95 is a popular CPU stress test and benchmark tool among overclockers. It’s part of a distributed computing project for finding Mersenne prime numbers, but it includes torture test and benchmark modes.

After you download the ZIP file and launch Prime95.exe, click the Just Stress Testing button to skip creating an account.

The torture test mode is ideal for testing the stability of your CPU, particularly if it’s been overclocked. If you want to perform a benchmark, click Cancel.

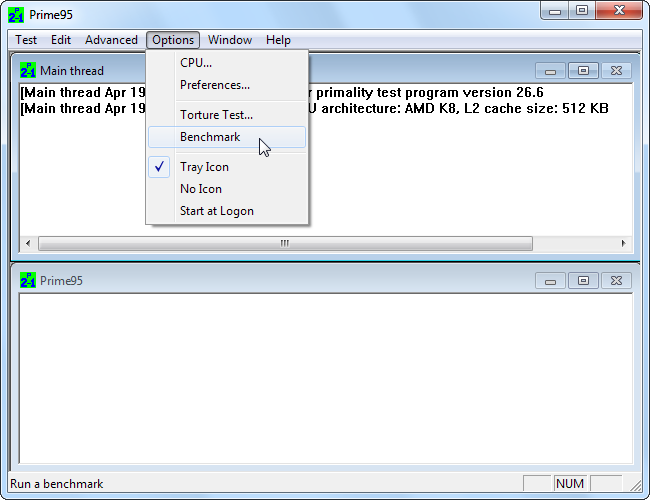
Use the Benchmark option in the Options menu to perform a benchmark.

Benchmark results are measured in time – lower values are faster, and therefore better. If you’re testing an overclock, compare the results of the Prime95 benchmark before and after the overclock to see the difference in performance. You can also compare your benchmark results to other computers on the Prime 95 website.

Super Pi, which calculates the digits of pi, is another popular tool for stress-testing and benchmarking CPUs.

Novabench

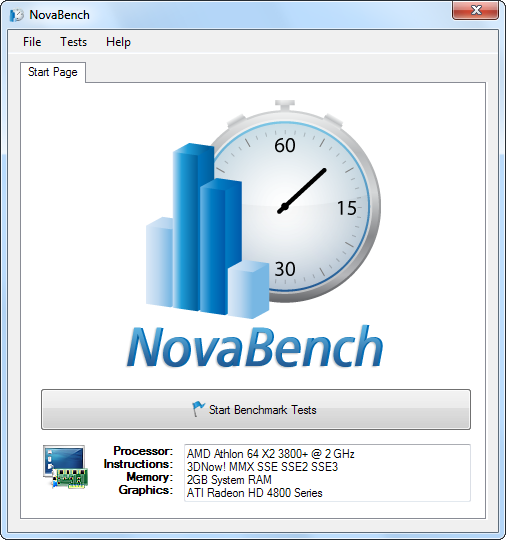
Novabench is a benchmarking suite with CPU, GPU (graphics card), RAM, and disk speed benchmarks. Unlike many all-in-one benchmark suites for Windows, Novabench is completely free. It’s not a trial and there’s no paid version with additional features that it’s trying to sell you.

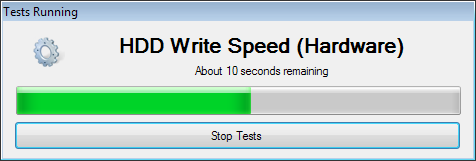
Novabench’s benchmark process is faster than many other full benchmark suites. It took about a minute on my system, while other benchmark suites took significantly longer.

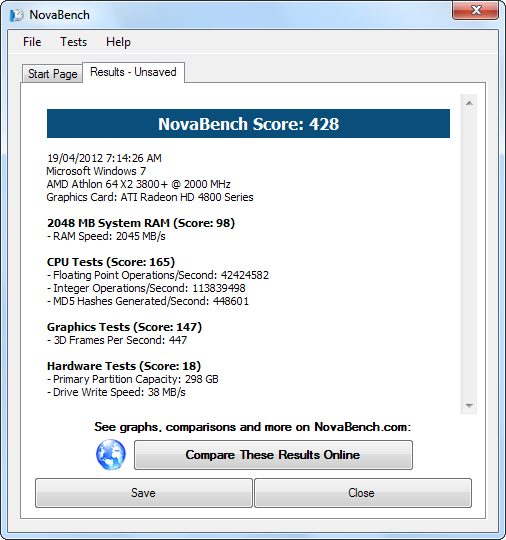
NovaBench displays an all-round “NovaBench Score” – higher is better – and shows the results of each individual benchmark. You can view other benchmark results and compare your score to other computers on the NovaBench website.


Mozilla Firefox includes many powerful features to prevent you from being tracked online, but they aren’t on by default. We’ll show you how to take control of your privacy online with Firefox’s options.

Firefox Internet Browser has some features that send personal data to Mozilla and Google, but these features aren’t required. Mozilla and Google use the date to improve Firefox, provide you with search suggestions and block malicious websites.

Firefox “Do-Not-TrackFeature

Firefox can send a “do-not-track” whenever you connect to a website, asking the website not to track you. It’s disabled by default, so you’ll have to turn it on yourself.

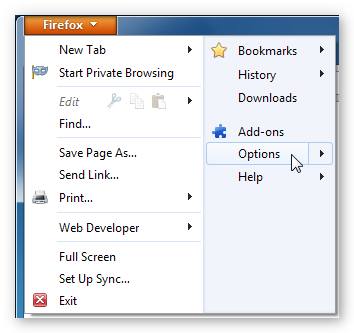
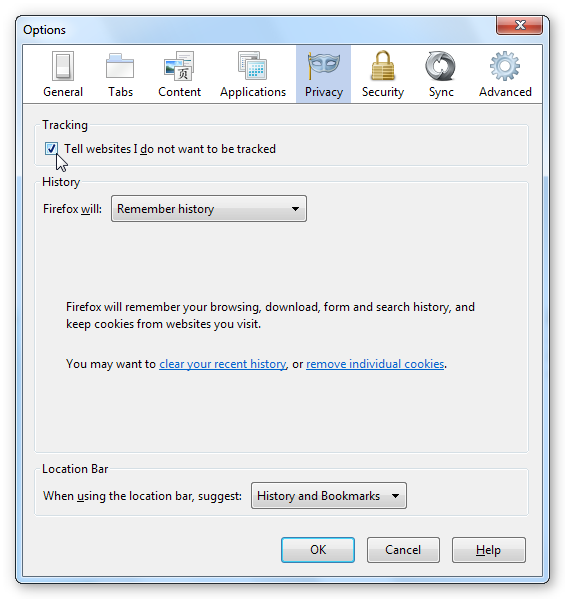
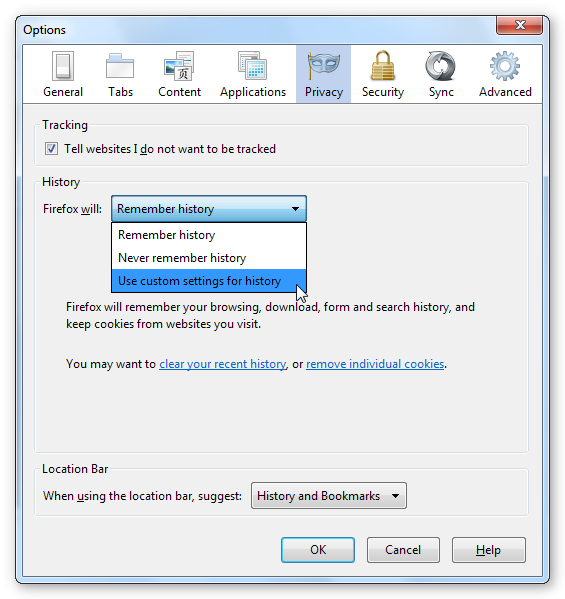
Select the Firefox menu, click Options and then the Privacy icon.

Click the “Tell websites I do not want to be tracked” check box at the top of the privacy pane to enable the do-not-track feature.

Unfortunately, few websites obey your do-not-track preference at the moment. Do not track is also available in Internet Explorer 9 and Apple Safari, but it’s noticeably absent in Google Chrome.

Search Suggestions

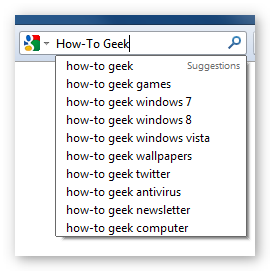
Firefox sends every letter you type into its search box to your default search engine, which sends search suggestions back.

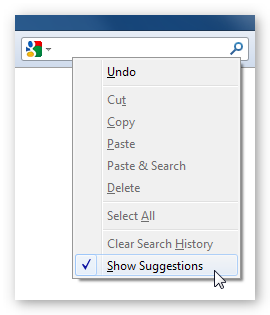
You can easily disable search suggestions by right-clicking the search box and unchecking Show Suggestions.

Safe Browsing

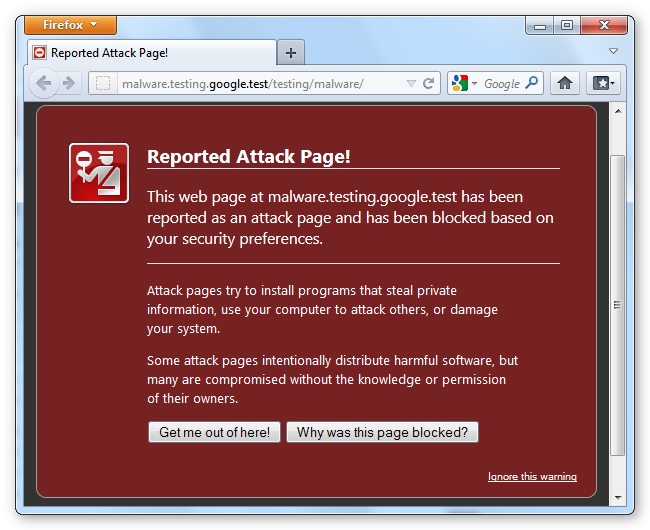
Firefox uses the same phishing and malware detection technology found in Google Chrome. Like Chrome, Firefox automatically downloads an updated list of malicious websites from Google every 30 minutes. If you try to access one of these websites, Firefox sends contacts Google to confirm the website is malicious.

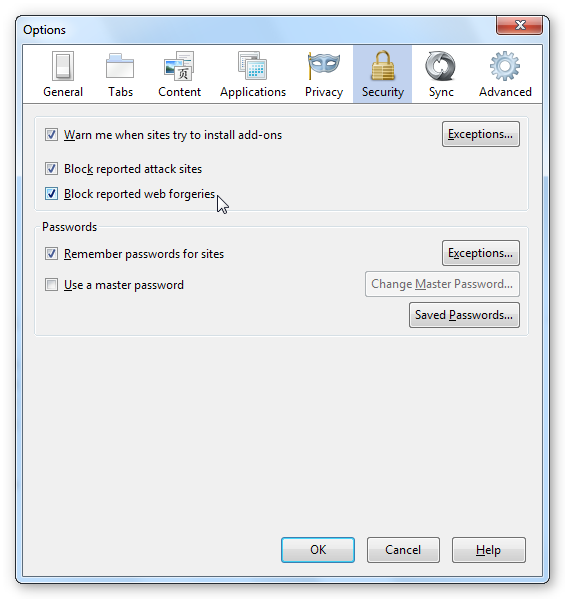
It shouldn’t be possible for Google to determine the exact website you tried to access, but Google cookies you have on your computer may also be sent. Phishing and malware detection helps protect your personal data and your computer’s security, but you can disable it using the options on the security pane.

Cookies

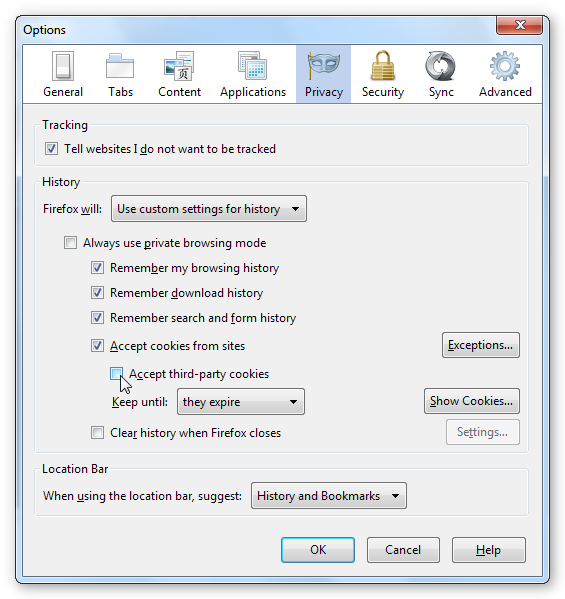
Click the “Firefox will” box on the privacy pane and select “Use Custom Settings for History” to view Firefox’s cookie options.

Many advertising networks track you across multiple websites with third-party cookies. You can disable these cookies by unchecking the Accept third-party cookies box. This may cause problems with some websites, so you may have to re-enable this check box.

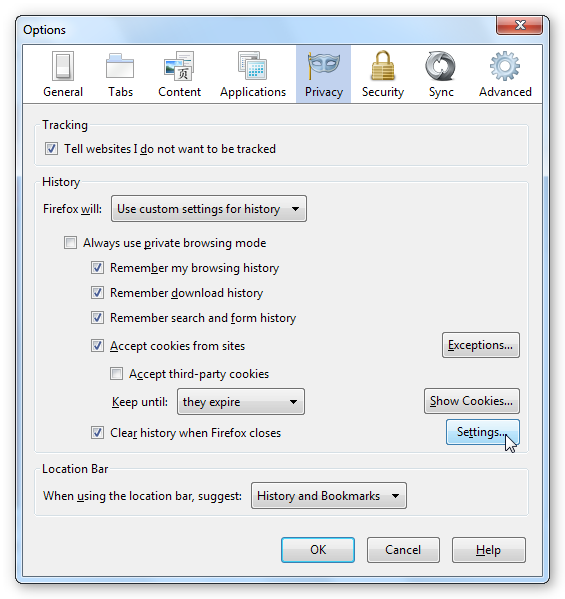
First-party cookies can be used for tracking, too. Many websites won’t work if you disable cookies entirely, but you can have Firefox automatically clear them each time you close your browser. This prevents websites from building up a profile of you over time, but you’ll have to log into any open websites each time you reopen Firefox. Just enable the “Clear history when Firefox closes” check box and click the Settings button.

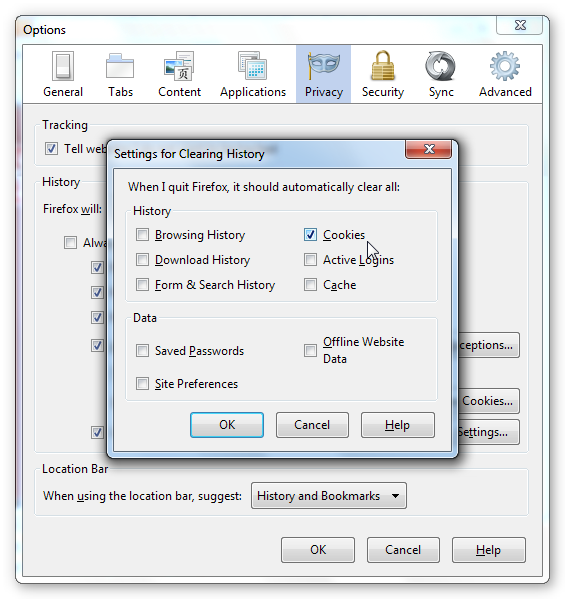
Select Cookies and any other type of data you want Firefox to automatically delete, and then click OK.

Crash Reports and Performance Data

Firefox can send crash and performance reports to Mozilla. Mozilla uses these reports to fix problems and help improve Firefox.

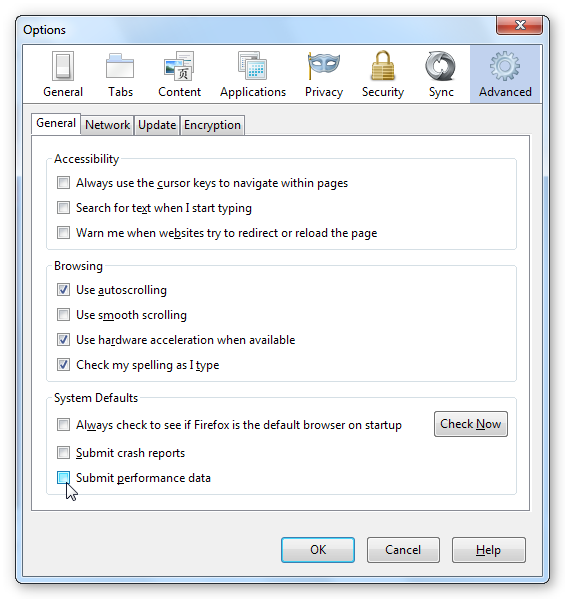
The Submit crash reports check box on the advanced pane controls the crash reports feature. Firefox never sends crash reports automatically; it always prompts you. You’ll still see the prompt if you uncheck this check box, but the crash report dialog will default to not sharing any data with Mozilla.

The Submit performance data option causes Firefox to send anonymous performance reports in the background. The reports contain information about how you use Firefox’s interface, how well Firefox is performing and what hardware your computer contains.

Remember to save your settings by clicking OK.


Here’s an in depth look at how to build a cell phone jammer:

Technical Details

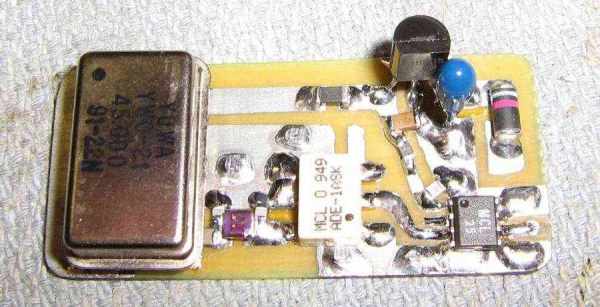
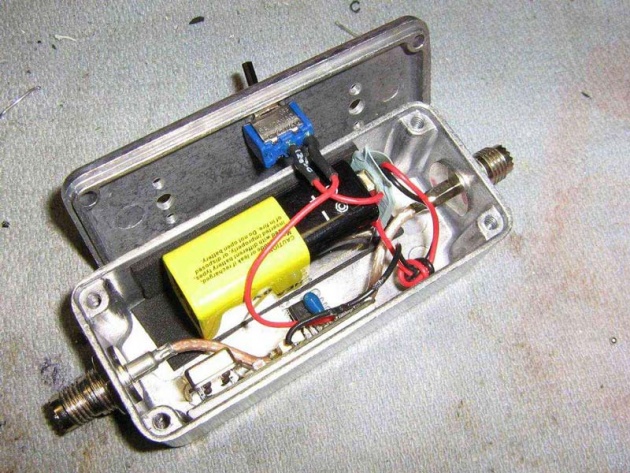
A lot of cell phones use a GSM800 mobile standard in order to operate, so my VCO (sweeping oscillator) is tuned to the 800MHz frequency range. Keep in mind that it could be difficult to make this  work properly without some good testing tools, but the end result will have the efficient VCO.

Use a clock oscillator for 45MHz as the noise generator for this jammer. It drives the local oscillator port which is located at the mixer. The signal is going out from the local oscillator and passes through the impedance matching network along its way. This helps equalize the impedance of 45MHz clock oscillator with the impedance of the mixer’s port.

This port acts like RF input of the signal jammer. The RF output signal passes through the amplifier on the mini-circuit. The output power is increased by additional 15-16dbm in this way. Then the output signal goes to the RF output antenna. RF input has the antenna too.

Jammer Operating

Use a 45MHz clock oscillator because the GSM800 band transmitted and received signals are always separated by the exact number of frequency and it is that 45MHz. Take this into account, cell phone user dials someone and signal goes off. RF input antenna catches it and jammer modifies this signal and lets it go. This signal has a frequency of cell phone’s received signal, so cell phone user would hear their own voice in a phone!

This particular cell phone jammer might be used to block the signal of the cell-based car tracking device which records your GPS data and sends it to some other person. And it probably can even jam some IED signals if they are controlled by cell phone GSM800 band.

The used mixer was originally made for 600MHz but with a little modification it works perfectly for 800MHz.

The amplifier is great for output power. Although it draws additional power supply, it is worth it.

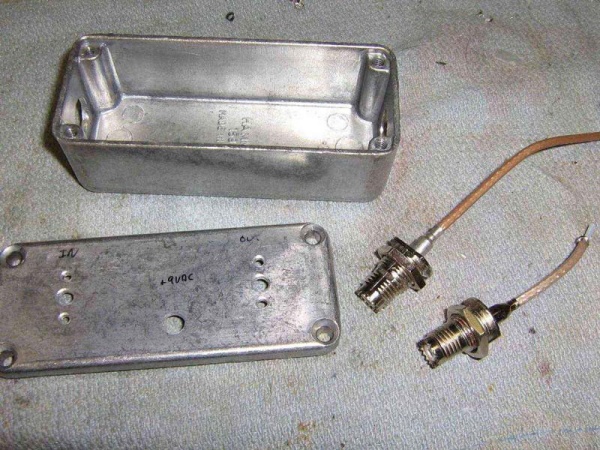
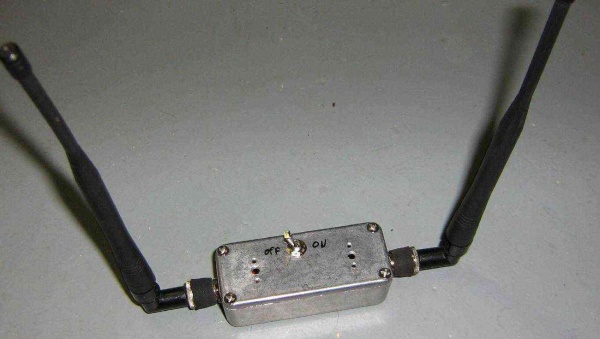
Jammer case was made from old aluminum box and UHF connectors you can take from an old Motorola phone.

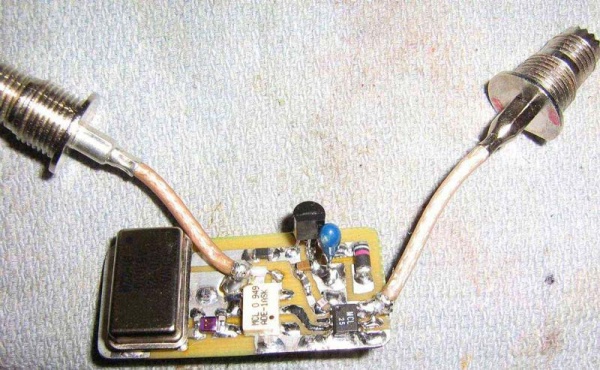
Those connectors must be soldered to the mini-circuit to work properly.

To supply this little signal jammer the nine volts battery with voltage regulator is enough. Separate it from other electronic components with foam plastic.

Don’t forget to make a power switch for your new creation. Also remember to attach antennas to the UHF connectors.


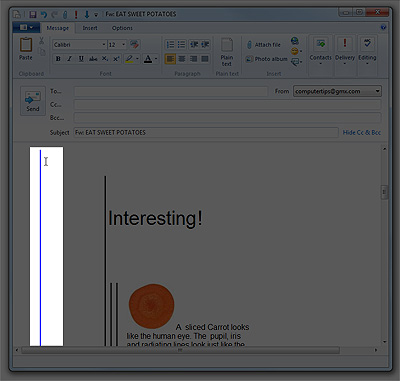
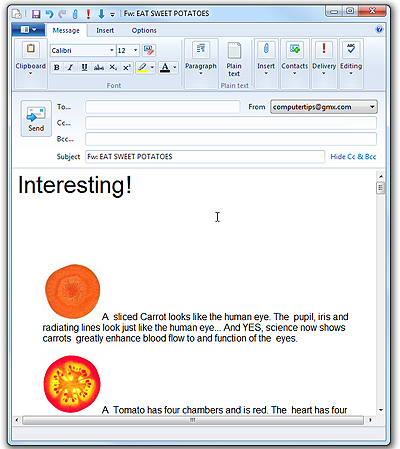
Have you ever tried to forward a really interesting or funny email, just to have the forward appear terribly formatted because of a ton of weird, blue vertical lines running down the left side of your email? Well grab a pen and sign up to the club because you are most definitely not alone.

A strange inconsistency created by some email clients/services when a message is forwarded, these vertical lines are not only irritating, but make the email illegible in some cases and are also a huge pain in the butt to get rid of as well.

Luckily, there are a few ways that you can speed up the process of removing these annoying lines without have to use a third part email cleaner program. So here are the top three methods to remove vertical lines in some of most common email software programs and services.

Microsoft Outlook:

Even though it arguably has the most options for formatting email of any other email program or service out there, Microsoft Outlook has, surprisingly, the simplest method of removing vertical lines from forwarded emails.

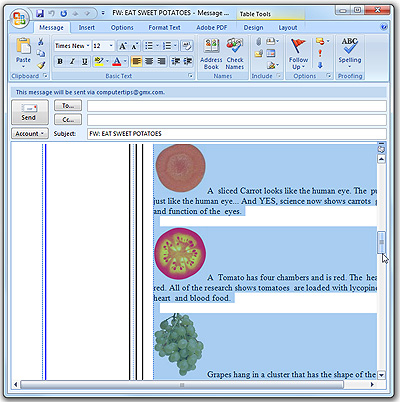
1. Open the email you want to forward, and then select the content directly in front or to the right of your vertical lines in the body of the email message. Press Ctrl+C to copy the highlighted contents to your clipboard.

2. Compose a new blank email message.

3. Paste your copied email into the new email message. If any vertical lines remain, simply copy any text and images with said vertical lines still attached, and paste the copied content into the same e-mail just above the content you just copied. Repeat until all vertical lines are gone.

4. Remove any duplicated content beneath the cleaned up email, and then send. No problem!

Windows Live Mail:

If you need to remove those pesky lines in the latest Microsoft mail service, Windows Live Mail lets gives you the perfect, simple option.

1. Choose your email message and then press the forward button to open it in the standard editor.

2. Put your mouse cursor directly in front of the vertical lines you want to delete.

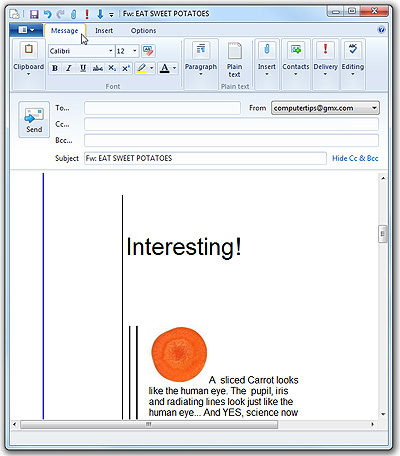
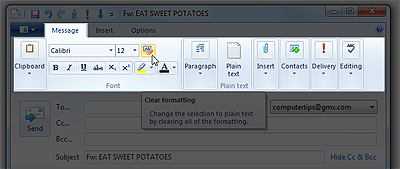
3. At the top of the editor, select the message tab if it’s not already selected by default. You’ll then see a variety of formatting options.

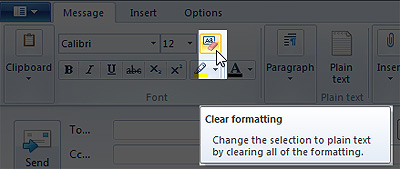
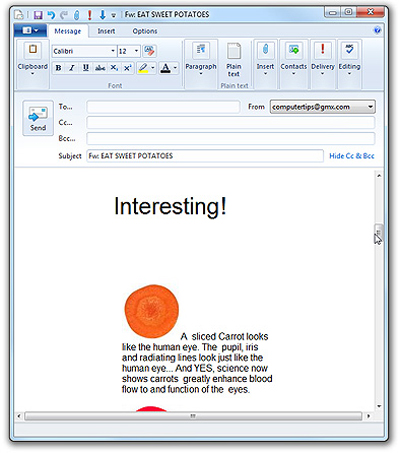
4. Select the Clear Formatting button just next to the Font size and style fields. The vertical lines will then be deleted.

5. Once all vertical lines have been cleared, you will likely be left with a bit of margin space to the right of your email content. To remove this, simply select the message content you wish to forward, then copy and paste it at the beginning of your message. Delete the old content beneath your freshly formatted message and you’re good to go!


Many cellular network carriers offer both international voice and data plans. While an international plan is not a requirement to use voice or data roaming on either your iPhone or iPad, your cellular network carrier may charge you some additional fees or much higher data rates if you don’t have one. Contact your service provider before you travel abroad and ask these questions:

  • Does your carrier offer cellular service in the country you’ll be traveling to?
  • Which carrier partners are supported in the country you’ll be traveling to?
  • Does your carrier have a data-roaming agreement in that specific country?
  • Does your current network/data plan have an international-roaming agreement?
  • What are the going rates for international voice and data roaming?
  • Are there any other charges or fees to consider while traveling?
  • Who do I call for voicemail and customer support when abroad?

International Traveling Tips

While you’re traveling in another country, your iPhone or iPad should automatically select the best network available. That being said, you can manually set each of those devices to work off a specific carrier network of your choosing.

Manually Set Cellular Network:

  • Tap Settings > Carrier and then Turn Off Automatic. Wait until you find all available networks that may appear.
  • Select the carrier you want to use during your stay. Keep in mind that this setting will probably only appear when you’re outside of your carrier’s network and other local carrier networks become available.

Turning off Cellular Data/Data Roaming to Avoid Roaming Charges:

  • iPhone – Tap Settings > General Network

IPad – Tap Settings > Cellular Data

  • Keep in mind that when your data roaming and cellular data are turned off, your shouldn’t see a cellular network indicator in the status bar.

Troubleshooting data roaming

If the time or date are off after your arrive, make sure the Automatic Time Zone is enabled in Settings > General > Data & Time > Set Automatically.

It’s possible that Visual Voicemail and Customer Service features in Settings > Phone > Services may not be available while staying in another country. Speak with your cellular network carrier about other ways to access these features while you’re away.

AT&T, Verizon, and Sprint customers can enable Settings > Phone > International Assist to automatically add the correct international prefix when dialing from abroad.

If you should encounter difficulties sending SMS/MMS or making calls while traveling abroad, try disabling International Assist to see if that resolves the issue.

If your iPhone 4S supports both CDMA and GSM roaming, you can use Settings > General > Network > Roaming > International CDMA to control which network your iPhone 4S uses:

  • International CDMA > on: iPhone 4S will attempt to use an available CDMA network instead of GSM.
  • International CDMA > off: iPhone 4S will use only GSM networks.

Keep in mind that after enabling International CDMA while on a GSM network, you should turn on airplane mode for 30 seconds to ensure that your phone switches over from your current GMS network to the CDMA network.

Visit iPadHacks.com for more tips and iPad Training.


The Mozilla Web Browser Firefox 13 has just barely reached our fingertips and we can already catch a glimpse of the Open-Source company’s newest endeavor: Firefox 14 Beta and the Firefox 15 Aurora as well.

The most predominant upgrades readily visible in the new Firefox are its new and improved security features that “make it easier for users to control their Web experience,” as stated in the official beta launch announcement late last week on the Mozilla blog.

A whole truck load of new features in the upcoming version of this extremely popular free and open source web browser are intended to make the Internet browsing experience a whole lot easier for its users. The release date of the final version won’t be until sometime in July, but until then, here some highlights of some of the key features and improvements you can expect in Firefox 14.

Default HTTPS

HTTPS will be activated by default for Google searches in the new Firefox 14 beta. This is aimed to protect users “from network infrastructure that may gather data, modify or censor search results,” Mozilla says. This new feature will also block third-party websites from gathering search data when you click link items on the search engine results page (SERP). “We look forward to supporting additional search engines as they enable SSL searches,” Mozilla says.
Better Plugins Control

Firefox 14 beta gives users more control on how plugins like QuickTime play through a new feature that can add a “play” button to all plugin content.  Users can now simply click “play” to begin viewing the media right away. “Future releases will include more specific customizations and a robust interface; for now, you can experiment with the feature by selecting plugins.click_to_play to ‘true’ in about:config,” Mozilla says.

URL Autocomplete

The Firefox 14 beta finally introduced the long awaited URL autocomplete. The Awesome bar (URL field) will now automatically offer suggestions to previously visited, or well known URL domains as you begin to type them, making web browsing even faster.

Improved Mac OS X Support

With Firefox 14 Mac users will get native full-screen support for OS X Lion 10.7, providing “a richer and more immersive browsing experience,” Mozilla says.

Better Website Identity Verification

Finally, Firefox 14 beta introduces a new way to show the verified identity of a website in the Awesome bar. A globe icon positioned next to the domain will indicate a website not using SSL encryption, while websites with SSL encryption will include a lock icon and show “https.” Sites that have an Extended Validation (EV) certificate, meanwhile, will be indicated by a green lock icon and include the name of the site owner. Sites with mixed http and https content show a gray triangle icon as a warning. This simple visual guide will make it easier to see the security level of the website you’re visiting, consequently making “spoofing” of secure sites a lot more difficult.

In addition, developers will get a sneak peak at some new key features in Firefox 14 beta, including a pointer lock API and pseudo class lock.

For those of you looking way ahead, Firefox 15 Aurora is now available as well. The most notable new addition to see there is native PDF support – a feature Google Chrome has exclusively had for some time now.

Remember that neither of these new web browser releases are designed for actual steady use, but if you’re interested in getting a sneak peak of what’s to come, they are both available to download with browser support for Mac, Windows, and Linux Distros. Firefox 14 beta is located on the Mozilla Beta page, and the Firefox 15 Aurora on the Aurora channel.


So you’re stuck with a program that does not have and uninstaller and consequently won’t uninstall because it’s not in add remove programs.

What you’ve should have tried already: Before you attempt to manually remove a program, you need to make sure that there is no uninstaller function. Check the start menu. If the start menu contains some sort of submenu for the unwanted program, there’s likely to be a link to the uninstaller for the program there. You can also do this by manually checking Window’s own list of many uninstallers. Select the start menu, and type appwiz.cpl in the search bar, and press enter. You’ll be able to locate all the uninstallers that Windows is aware of in alphabetical order. The last regular thing you can do it to try googling the name of the program and the word uninstall. But none of these have worked obviously which is why you’re here. So you’re going to have to do it manually.

How to manually uninstall a program that won’t uninstall:

1. Create a system restore point.

2. Boot the computer in safe mode.

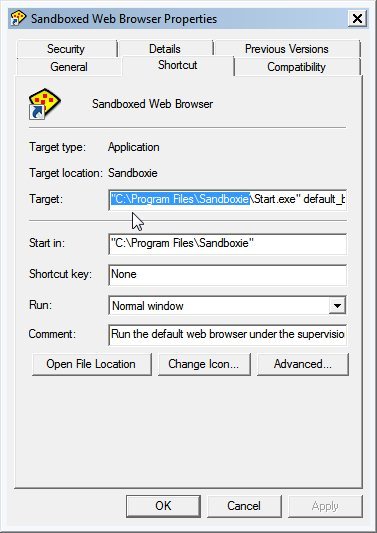
3. Find the path to the program folder. If there is a shortcut to the program on your Start menu or the desktop, right-click that shortcut and select properties. The path is everything in the target field except the file name. The path is also likely the entire contents of the “Start in” field. If you don’t find a shortcut, go to C:\Program Files and look for the appropriate folder.

4. Delete the program folder.

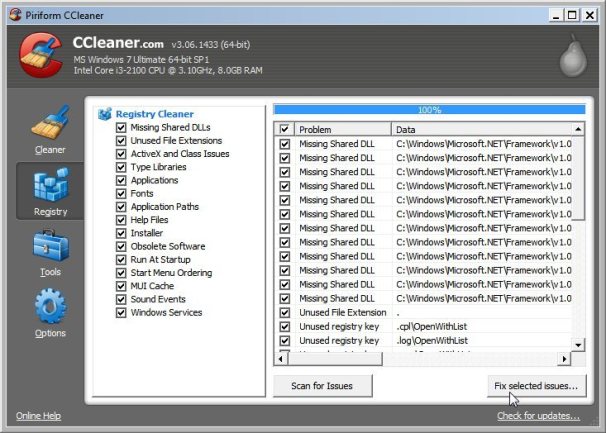
5. Clean the registry. You want to make sure that all references to the program from the registry are removed. Any registry cleaner program will do.

6. Delete all of the program’s related shortcuts. Do this in any location that they might be – the Start menu, the desktop, and so on.

7. Restart your computer. You’ve successfully removed the program!

© 2011 Suffusion theme by Sayontan Sinha
WordPress SEO fine-tune by Meta SEO Pack from Poradnik Webmastera