Select your Browser:
(skip to Chrome 14 or Internet Explorer 9)
Exporting and Backing Up Your Bookmarks
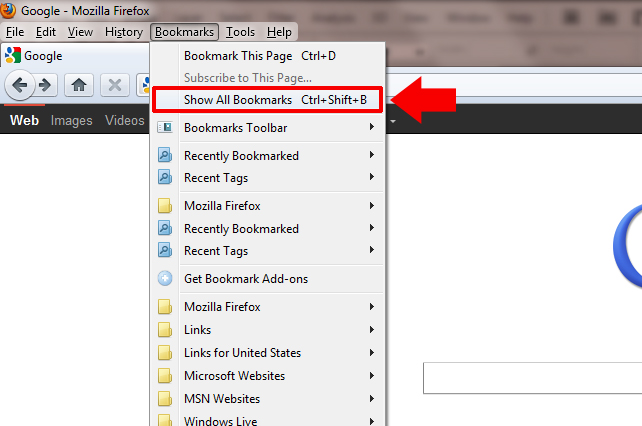
Begin by starting Firefox. Once it has opened, find the “Bookmarks” tab in the menu bar located on the top left of the screen.
Select “Show All Bookmarks” from the drop-down menu that appears.
This will open a new “Library” window. Look for the “Import & Backup” menu towards the top. Click on “Export HTML…”
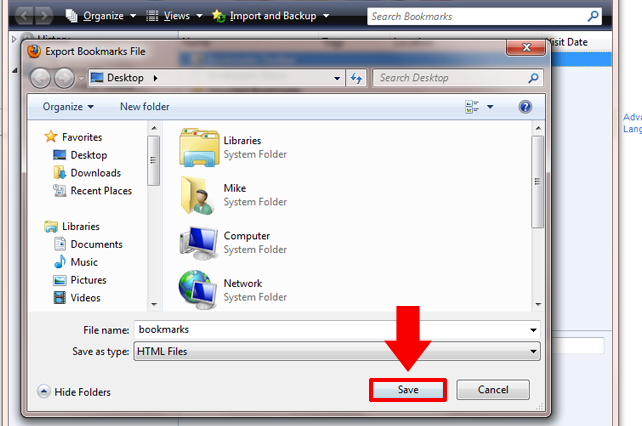
This will allow you to choose a name and location for your backup file. For this tutorial, we will leave the default name “bookmarks” and save it on the desktop. Feel free to rename the file and save it where you see fit.
Congratulations! You’ve successfully backed up your bookmarks. Keep this file somewhere safe and you will be able to restore your bookmarks on this or any other computer. I save the file on a USB Flash Drive that I keep on my keychain, so I’m never without my bookmarks. Another great way to save the file is to email yourself, saving the bookmark file as an attachment. That way your file is safely stored in your email indefinitely (just make sure not to delete that email!). So how do you actually use this file to import your bookmarks? Funny you should ask…
Importing Your Bookmarks
So you’ve created a backup of your bookmarks, and now you need to Import them. There are plenty of reasons you may need to. Maybe you’ve bought a brand new computer or reformatted your old one. Maybe your old internet browser sucks and you downloaded a new one (I’m looking at you Internet Explorer ಠ_ಠ). Or maybe you just need to access your bookmarks from the office or from a friends house. This is how you do it:
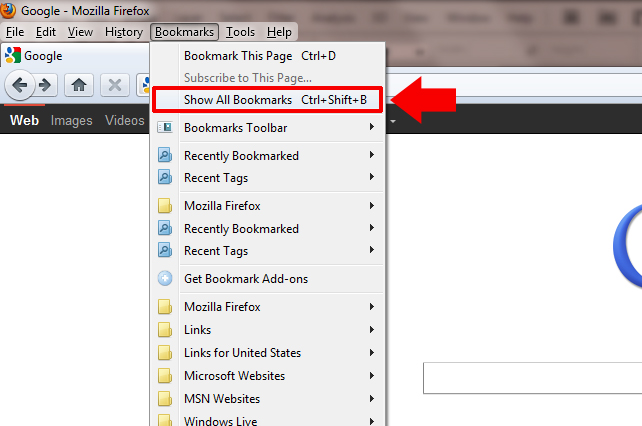
Open up Firefox, and click on “Show All Bookmarks” in the Bookmarks menu, just as you did to export your bookmarks in the first place.
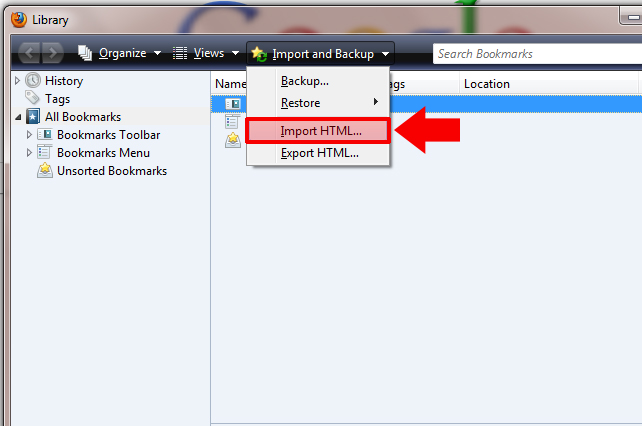
This time we will be looking for the “Import HTML…” button, under the “Import and Backup” menu.
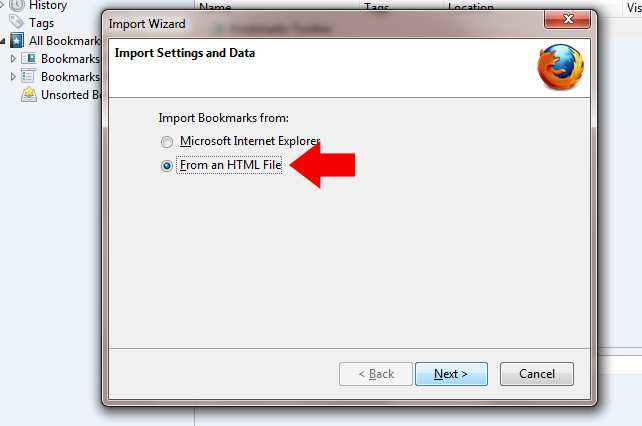
Clicking on Import will launch the “Import Wizard”. It will ask if you want to import from Internet Explorer, or from an HTML file. In this case, we choose HTML file.
Clicking Next will allow us to navigate to the backup file. Mine is on my desktop, but yours may be on your USB Drive, in your download folder (if you emailed it to yourself and then downloaded it from your email) or anywhere else you might have decided is a good place to keep the file. Simply find the file, select it and click “Open”.
Voilà! Your bookmarks have been imported!
(back to Firefox 7 or skip to Internet Explorer 9)
Exporting and Backing Up Your Bookmarks
Exporting your bookmarks in Chrome is very similar to exporting bookmarks in Firefox, you just need to know where to find the proper menus and options.
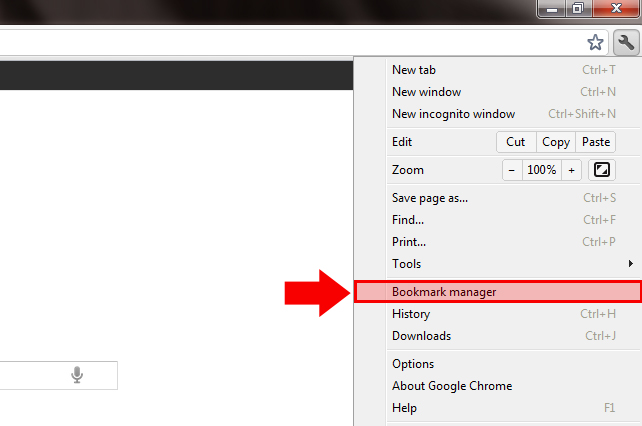
Start by opening Chrome and finding the options button. The options button is a wrench icon, and is located on the top right of the window.
Select “Bookmark manager” from the options menu, and a new tab will open in Chrome.
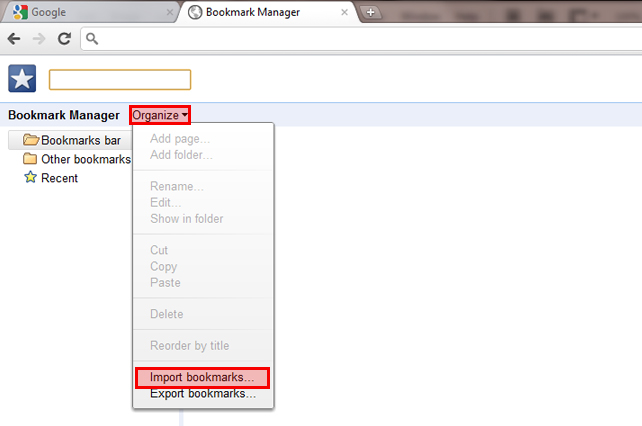
Click on the “Organize” drop down menu, and you will find the familiar “Export bookmarks…” command.
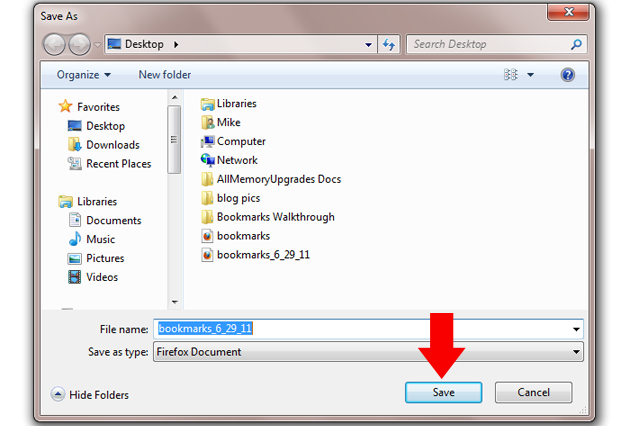
Clicking on Export Bookmarks will open a screen allowing you to choose a destination for you bookmark backup file. Once more, I am saving onto my desktop, but you may save onto a USB Memory Drive or anywhere else you please, just be sure you know where to find the file when you need it.
Click save and that’s it! Your bookmarks are saved for future use. If you skipped the Firefox section, I gave a helpful tip about sending this file to yourself as an email attachment. This way you can access the file anywhere in the world, so long as you have a working internet connection. Personally I save the file to a USB drive. It’s the most convenient thing for me, as I always have my flash drive on hand (it’s on my keyring, so I literally never leave home without it). Plus you can keep all kinds of other useful files on the drive.
Importing Your Bookmarks
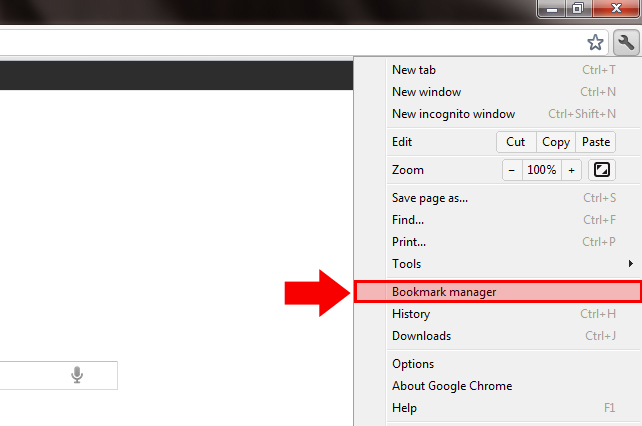
Once more open the Bookmark Manager, just as we did to backup the bookmarks.
Click on “Organize” and this time, select “Import bookmarks…”
Navigate to the bookmark backup file, select it, and click “open”.
Well done! You have imported your bookmarks and can now browse the internet unimpeded! (Assuming you aren’t behind a webfilter or in a country that blocks certain internet traffic.)
(back to Firefox 7 or Chrome 14)
Exporting and Backing Up Your Bookmarks
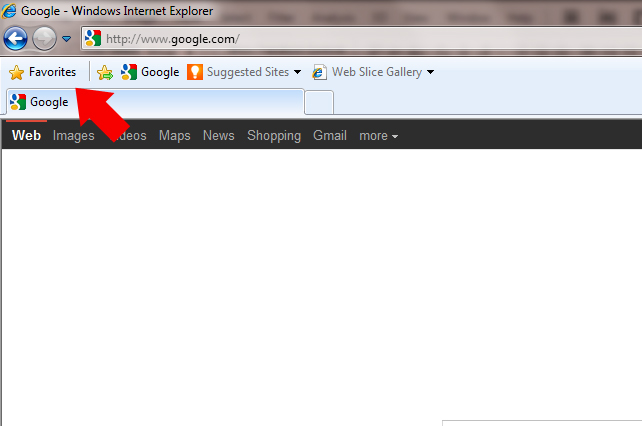
Begin by starting Internet explorer. Look for the Favorites button with a yellow star next to it, towards the top left of the screen.
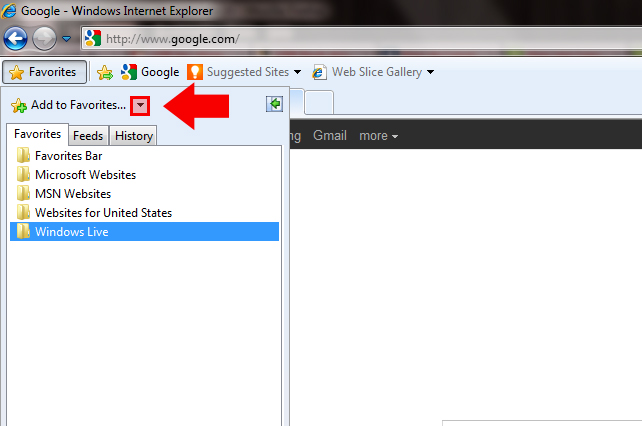
Clicking on the Favorites button will open the favorites sidebar. At the top of the sidebar you will find the “Add to Favorites…” button, with a small arrow beside it. Click directly on the arrow and a small drop-down menu will appear.
Choose “Import and Export…” from the drop down menu.
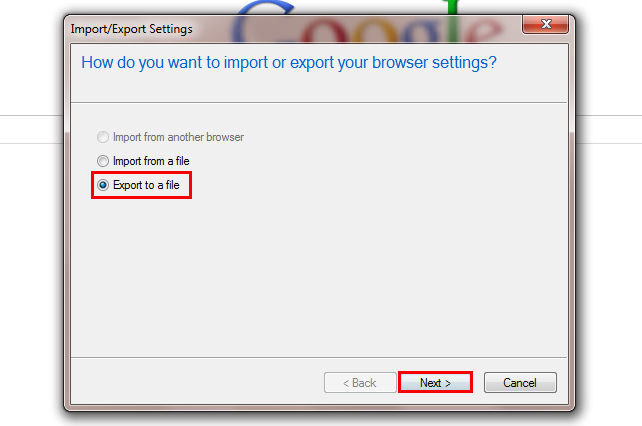
A small window will open and give you the option of Importing your bookmarks, or exporting them. Make sure “Export to a file” is selected, and click next.
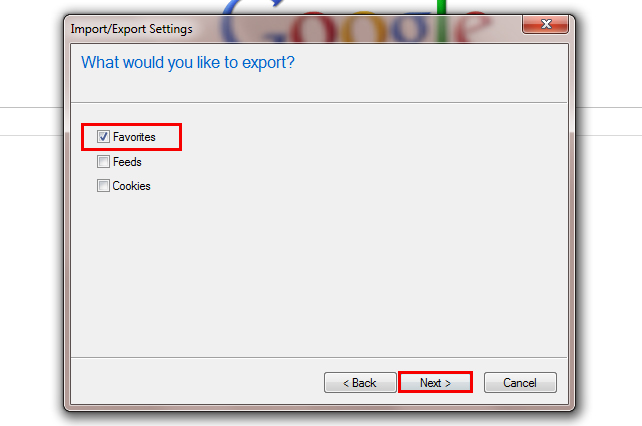
It will now give you the option to export your cookies and feeds as well as your favorites. For this tutorial we will only select “Favorites”.
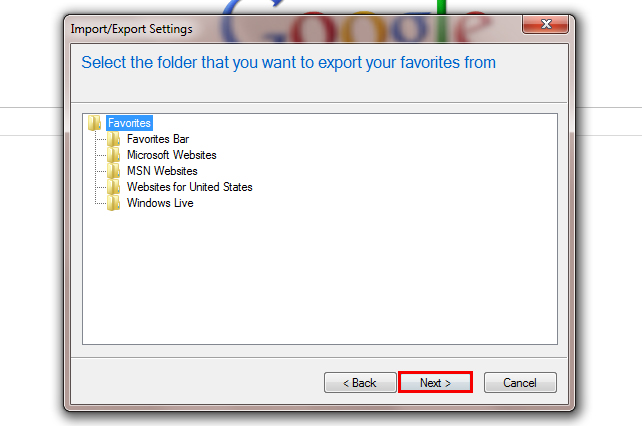
Next Internet Explorer will give you the option of selecting which of your bookmarks you want to save. To save them all, we want the top folder, “Favorites”, selected. This is set up for you by default so unless you only want to export part of your favorites, leave it this as is and click “Next >”.
Finally you will be asked where you want to save your backup. For convenience I saved mine to the Desktop, but you may choose to save it elsewhere. Once you selected a place to save the file, click “Export”.
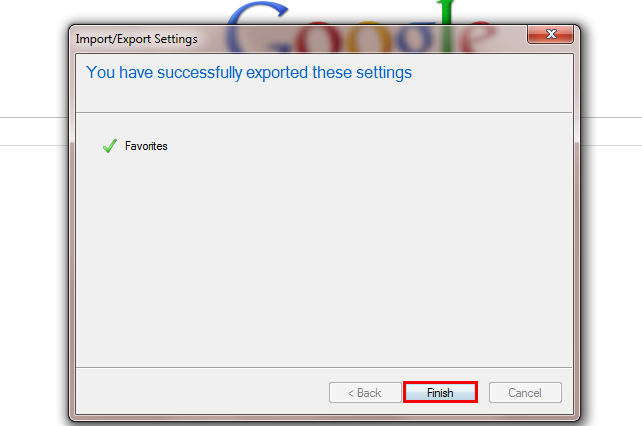
Internet Explorer will now inform you of your resounding success. Nothing left to do but click “Finish” and bask in the warm feeling of accomplishment.
Importing Your Bookmarks
If you followed my guide to export your Internet Explorer bookmarks, these first few steps may seem familiar, and they should, because they are exactly the same.
Begin by starting Internet explorer. Look for the Favorites button with a yellow star next to it, towards the top left of the screen.
Clicking on the Favorites button will open the favorites sidebar. At the top of the sidebar you will find the “Add to Favorites…” button, with a small arrow beside it. Click directly on the arrow and a small drop-down menu will appear.
Choose “Import and Export…” from the drop down menu.
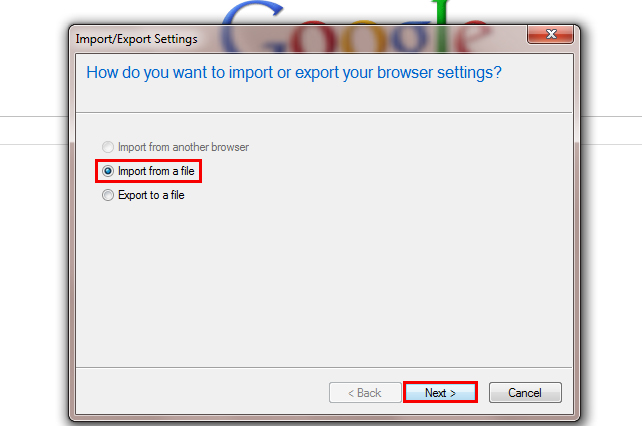
A small window will open and give you the option of Importing your bookmarks, or exporting them. This time, make sure “Import from a file” is selected, and click next.
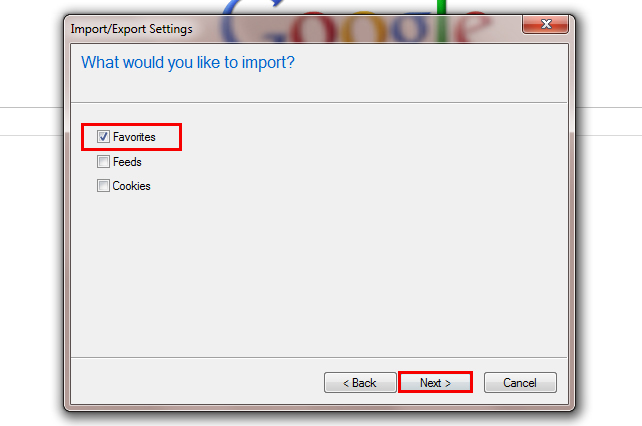
Again Internet Explorer will give you the option of importing your favorites, cookies and feeds. I will only be importing the Favorites, though you may choose to import Feeds and Cookies as well if you feel this is necessary. Click on the squares by the options to check them, and click “Next >” when you are finished.
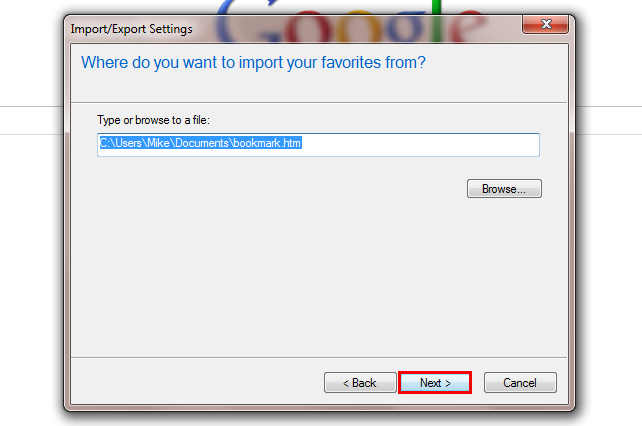
It will now ask you where the backup file is located. Use the browse button to locate your backup file and click next.
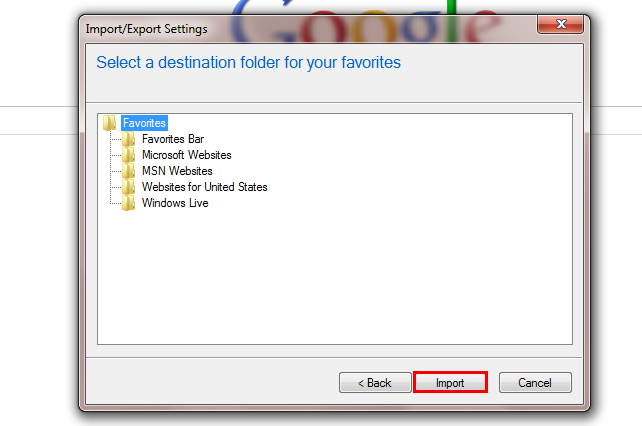
Now you will have the opportunity to choose where in the favorites folder you want your imported bookmarks to appear. For example, if you want to keep the imported favorites in a separate folder called “Imported Bookmarks” you will be able to do that. To have the favorites save to the main favorites list, just leave the top folder selected and click “Import”.
Internet Explorer will let you know that you have successfully imported your bookmarks. The only thing left to do is click “Finish”.
Congratulations, you are now a master at backing up, exporting and importing your bookmarks/favorites.


