The Mozilla Firefox Internet Browser does a fantastic job of saving your usernames and passwords so you don’t have to remember them next time you visit a website. While this feature is a great tool, Firefox doesn’t include a good backup method to save passwords and user accounts in case you need to restore or copy them to a safe location. You can backup your entire Firefox directory, but if you just want to keep a backup copy, or you need to sync them with another computer, the Firefox extension Password Exporter is all you need.

How to Export Saved Passwords Out of Firefox

The Firefox add-on Password Exporter lets you export and import you saved usernames, passwords, and disabled login hosts between computers or just to keep as a backup copy. All of your saved passwords will be exported to an XML or CSV file and can be encrypted for protection.

To install Password Exporter go to Tools >> Add-ons. Search for Password Exporter, click on “Install Now”, follow the instructions, and then restart Firefox after the installation is completed.

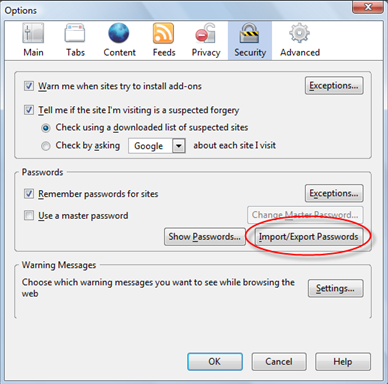
Access Password Exporter from Tools >> Options and select the Security Tab.

Locate the “Import/Export Passwords” button in the Saved Passwords section:

To export, click on the “Import/Export Passwords” button and select “Encrypt Usernames/Passwords” check box (recommended for security purposes) then click on “Export Passwords”.

To save the file, give it a name and select to either save it as a XML or CSV file.

Once saved, you can back it up or import it to another Computer running Firefox with Password Exporter installed.

 

The autocomplete feature is a very useful and efficient tool to use when browsing the web. As you type in the first few letters of a web address, Firefox will suggest one web address that matches. You can type in additional letters until you see the web address you want and press Enterto go there. In this tutorial we’ll show you how to set Firefox to fill in automatically while you’re typing a web address.

  • Open Mozilla Firefox Internet Browser.
  • In the Location bar, type about:config and press Enter. This will redirect you to a warning page that says This might void your warranty!
  • Click the button that says I’ll be careful, I promise! to continue to the about:config page.
  • Type the preference name, browser.urlbar.autoFill in the Search field located at the top of the page.
  • Change the value of this preference to true. To do this, simply double-click where you see the preference name browser.urlbar.autoFill. To turn off, double-click the preference name to change its value to false.
  • Close the browser.
  • Reopen Firefox and type in a web address to try out. Once you see the address you’re looking for, stop typing and press Enter. This saves time and works great!


Mozilla Firefox took the App Tabs concept and incorporated it into another really great feature they call, ‘Tab Groups’ also known as Panorama. Now Tab Groups allows you to visually group related tabs into clusters and then lets you switch between them and quickly search through all your various tabs. You can navigate through dozens of tabs in little to no time.

This is NOT to be confused with Internet Explorer Tab Groups. That… that would just be wrong.


Why you should use Tab Groups

If you have enough tabs that it’s borderline ridiculous, then Tab groups might just be for you. If you’re regularly ending up with more tabs than fit on the Tab Strip, then Tab groups could be right up your alley. If you’re constantly going a hundred miles a second on the internet to get through your crazy work day, then you’d better listen up.


How to Create a Tab Group / How to Navigate through Tab Groups

You should already have a number of tabs to work with but if you don’t, go ahead and open a few now.

1.) Enter the Tab Groups view by clicking the List All Tabs button at the far right of the Tab Strip. It doesn’t say ‘All Tabs’ so look for the button with an arrow in the middle pointing down. Press Ctrl + Shift + E for the shortcut.

2.) When you enter the Tab Groups view for the first time, you’ll see thumbnail previews of all of your tabs in one group. To make a new group, simply drag one tab out of the group and then drag a second one on top of it. A box will be drawn around them.

3.) When you are done, just click on a tab to exit the view. You will be returned to Firefox, the tab you clicked on will be active and only the tabs in that group will be visible.

4.) Click on a tab in the group you want to switch to and you’ll exit the view and be returned to Firefox. The tab you clicked on will be active and only the tabs in that group will be visible.

5.) Click the search button on the right side of the window to bring up the search box and then just begin typing the name of the tab you’re trying to find.

6.) As you type, the tabs that match your search will be highlighted. Just click on a tab to select it and be returned to Firefox.


Yeah I'd rather stick with Firefox


App Tabs is a cool feature by Mozilla Firefox that lets you always keep your most visited web sites like Facebook, Twitter and Gmail open in miniature tabs. Apps tabs open automatically each time you launch Firefox and can’t be closed by accident. In this tutorial we will show you how to make and use Firefox App Tabs.

Why you should use App Tabs

Firefox App Tabs allow you to pint any website to the left side of the Tab Strip so that it’s always available, loaded, and ready. In this way, you can receive notifications from websites like Twitter, Facebook, and Gmail without even breaking a sweat. It helps too if you’re like me and periodically late to work (almost every day) and need your company’s clock in website open and ready when you launch the internet browser.

Or it could just save you the refresh…

Typical day at the office


How to make an App Tab

Right-click on the tab you want to keep as an App Tab and select Pin as App Tab from the menu.


How is App Tabs different than a regular tab or a bookmark?

- App Tabs don’t have a close button so they are always open and you can’t close them by accident.

- They notify you with a blue highlight when you receive new data on the site like an email, comment or message.

- All the App Tabs will automatically launch each time you launch Firefox, so you don’t have to wait for it to load like a bookmark.

- When you open a link in App Tabs, it’ll automatically open in a new tab so your App Tabs stay on the same page.

- App Tabs are smaller and out of the way.


Mozilla Firefox provides useful, customizable toolbars that provide easy access to common features and sites. In this tutorial we’ll show you how toolbars can be displayed or hidden depending on your preferences.

  1. Open the Mozilla Firefox Internet Browser. On the top, you’ll notice a menu bar that says File, Edit, History, Bookmarks, Tools and Help. Next to that is an empty section known as the Tab Strip.
  2. Right-click the Tab Strip. The menu will display various toolbars with or without check marks next to them:
  • Menu Bar – This is your most basic Firefox toolbar that displays the browser menus File, Edit, View, History, Bookmarks, Tools, and Help. If you choose to keep the menu bar hidden, you can always temporarily show it by pressing the Alt key.
  • Tab Strip – This is the section where your web page tabs are displayed. You cannot remove the tab strip, but you can rearrange it to be above or below the Navigation Toolbar. To do this, right-click the tab strip and check/uncheck Tabs on Top.
  • Navigation Toolbar – This is your web address toolbar. It contains your web site navigation buttons, the location bar, the search bar, the home button and the bookmarks button.
  • Bookmarks Toolbar – Contains your bookmarks and bookmark folders.
  • Add-on Toolbar – this toolbar is associated with your Firefox extensions and is located at the bottom of the Firefox window.
 

Mozilla Firefox Sync is a service that allows you to synchronize your bookmarks, history, passwords, Firefox add-ons and open tabs with another Firefox browser. This can be useful when changing computers or syncing your browser settings between a computer and a mobile phone. To do this, you’ll first need to set up Firefox Sync on your main computer and then add each of the other computers you want to sync the information with.

In this tutorial we will be showing you how to setting up Firefox Sync on your home computer and then synchronize it with your mobile smartphone.


How to set up Firefox Sync on your home computer

  • Launch the Mozilla Firefox Internet Browser. On the top, you’ll notice a menu bar that says File, Edit, History, Bookmarks, Tools and Help.
  • Click on Tools and then select Set Up Sync. A window will then pop up titled, Firefox Sync Setup.
  • Click on Create a New Account. Enter your email address, choose a password, and agree to the Terms of Service and Privacy Policy by checking the box next to it. You can customize which information gets synced by clicking Sync Options then checking and unchecking which data you’d prefer synced or not synced.
  • Click Next. You’ll see a window that says, Setup Complete! Click Close to finish.

Add mobile to your Firefox Sync with the easy setup code

Setup Firefox Sync on Android:

  • Open the Mozilla Firefox Mobile Browser.
  • Swipe left, and tap on the settings icon located on the bottom right.
  • Select the Preferences Tab on the top. Next locate the section titled, Sync.
  • Tap the Connect button under the Sync Section. The setup code will then be generated.
  • From a Firefox Sync-connected computer, go to the Sync options and select Add a Device. Enter the setup code provided.
  • IF you are NOT near your computer, tap I’m not near my computer.
  • Enter your account information: Email address, password, Recovery Key and then tap Connect.

Setup Firefox Sync on iPhone:

  • Download and launch the Firefox Home app.
  • Tap I Have a Sync Account. The setup code will then be generated.
  • From a Firefox Sync-connected computer, go to the Sync options and select Add a Device. Enter the setup code provided.
  • IF you are NOT near your computer, tap I’m not near my computer.
  • Enter your account information: Email address, password, Recovery Key and then tap Connect.
 

The Firefox Site Identity Button is an internet security feature that provides you with detailed information about the websites you visit. With the Site Identity Button you can figure out if a website you’re visiting is verified, if it is encrypted, who owns the website, and what company verified it. This helps individuals avoid unverified, potential harmful websites that are asking for your personal information.

The Firefox Site Identity Button can be found in the site Location bar to the left of the web address you type in.

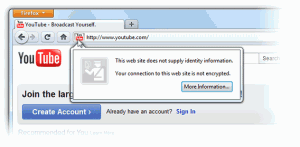
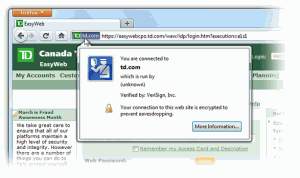
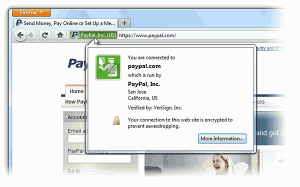
When you click on the Site Identity Button, it will display security information about the website you’re currently viewing. Based on the amount of information and verification provided, the Site Identity Button will be displayed in one of three colors: Gray, Blue, or Green. A matching color Passport Officer icon will also appear when you click on the Site Identity Button.


Gray – No Identity Information

If a website does not provide any identity information at all, then the Site Identity Button will be gray. If you’re entering any personal information into the site, such as back account information, credit card data, or social security numbers, then the Site Identity Button should not be gray. Gray signals you that the connection between Firefox and the server is unencrypted and should not be considered safe against possible eavesdroppers. That being said, you will find that most websites will have a gray button. This is because they do not involve the passing of sensitive information back and forth and do not really need to have verified identities or encrypted connections. As long as the site does not require that you enter personal information, the gray Site Identity Button is no indication of a problem with the site.

Blue – Basic Identity Information

When the Site Identity Button is blue, this lets you know that the site’s domain has been verified, and that the connection between Firefox and the server is encrypted and therefore protected against eavesdroppers. This means that the organization or people who are running the site in question have purchased a certificate proving that they are the owners of the domain name and it is not being spoofed by spammers. However, the company that owns the domain isn’t verified. There would be no guarantee that sunnysurfshop.com is actually owned by the Sunny Surf Shop. The only thing you know is that the domain is valid and that the connection is encrypted.


Green – Complete Identity Information

If a website provides fully verified information about its owner and that the connection is encrypted, then the Site Identity Button will be Green. This means that the website is using a new Extended Validation (EV) certificate. An EV certificate is a special type of site certificate that requires a significantly more detailed identity verification process than other processes. While the Blue Site Identity Button lets you know that a site is using a secure connection, the Green Site Identity Button shows you that the connection is secure and that the owners of the domain are who you expect them to be.


Firefox 11 Internet Browser lets you import settings, cookies, history, and bookmarks from Google Chrome. Before this version of Firefox, you could import all that from Internet Explorer, Opera and Safari, but not Chrome. If you’ve been using Google Chrome as your primary Internet browser and want to switch to Firefox 11, you will probably want to import your Google Chrome data into Firefox 11.

  • Close your Google Chrome Internet Browser.
  • Open your Firefox 11 Internet Browser
  • On the Firefox menu bar click Bookmarks. If you do not see the Bookmarks Menu Tab, press the ALT key on your keyboard and the menu will appear.
  •  Click on the “Show All Bookmarks” option in the Bookmarks menu. As an alternative, click “CTRL + Shift + B” on your keyboard. A new window will pop up on your desktop, titled “Library”.
  • From the Library Menu click Import and Backup on the top, then Import Data from Another Browser.
  • An Import Wizard window will then pop up. Select Google Chrome and click Next.
  • Select which items you would like to import from Google Chrome. Choose from Bookmarks, Browsing History, and Cookies, then click Next.
  • A message confirms that the import is completed. Click Finish.

Your Google Chrome bookmarks will now appear in your Firefox bookmarks menu. You will have to rearrange them in the order you had in Google Chrome. Browsing history will be available in the History tab in the Firefox menu bar.

© 2011 Suffusion theme by Sayontan Sinha
WordPress SEO fine-tune by Meta SEO Pack from Poradnik Webmastera