Mozilla Firefox Sync is a service that allows you to synchronize your bookmarks, history, passwords, Firefox add-ons and open tabs with another Firefox browser. This can be useful when changing computers or syncing your browser settings between a computer and a mobile phone. To do this, you’ll first need to set up Firefox Sync on your main computer and then add each of the other computers you want to sync the information with.

In this tutorial we will be showing you how to setting up Firefox Sync on your home computer and then synchronize it with your mobile smartphone.


How to set up Firefox Sync on your home computer

  • Launch the Mozilla Firefox Internet Browser. On the top, you’ll notice a menu bar that says File, Edit, History, Bookmarks, Tools and Help.
  • Click on Tools and then select Set Up Sync. A window will then pop up titled, Firefox Sync Setup.
  • Click on Create a New Account. Enter your email address, choose a password, and agree to the Terms of Service and Privacy Policy by checking the box next to it. You can customize which information gets synced by clicking Sync Options then checking and unchecking which data you’d prefer synced or not synced.
  • Click Next. You’ll see a window that says, Setup Complete! Click Close to finish.

Add mobile to your Firefox Sync with the easy setup code

Setup Firefox Sync on Android:

  • Open the Mozilla Firefox Mobile Browser.
  • Swipe left, and tap on the settings icon located on the bottom right.
  • Select the Preferences Tab on the top. Next locate the section titled, Sync.
  • Tap the Connect button under the Sync Section. The setup code will then be generated.
  • From a Firefox Sync-connected computer, go to the Sync options and select Add a Device. Enter the setup code provided.
  • IF you are NOT near your computer, tap I’m not near my computer.
  • Enter your account information: Email address, password, Recovery Key and then tap Connect.

Setup Firefox Sync on iPhone:

  • Download and launch the Firefox Home app.
  • Tap I Have a Sync Account. The setup code will then be generated.
  • From a Firefox Sync-connected computer, go to the Sync options and select Add a Device. Enter the setup code provided.
  • IF you are NOT near your computer, tap I’m not near my computer.
  • Enter your account information: Email address, password, Recovery Key and then tap Connect.
 

Mozilla Firefox had a Do-not-track feature that lets you tell websites that you don’t want your browsing behavior tracked. Some major websites track your browsing behavior so that they can then sell or provide that information to other companies, which in turn, show ads, products or services specifically targeted to you. This includes information about what sites you visit, things you like, dislike and purchase. In this tutorial we will explain how the Firefox Do-not-track feature works and show you how to turn it on.


How does the Do-not-track Firefox feature work?

When you use the Do-not-track feature, Firefox instructs every website you visit, which includes their advertisers and other content providers, that you don’t want your Internet browsing behavior tracked. Turning on the Do-not-track feature will in no way affect your ability to log into websites nor cause it to forget your private information, such as saved shopping carts, location information or login information.


How to turn on the Do-not-track feature in Firefox

Launch the Mozilla Firefox Internet Browser. On the top, you’ll notice a menu bar that says File, Edit, History, Bookmarks, Tools and Help.

Click on Tools, and then select Options.

A new window will pop up titled Options. You’ll see a menu bar on the top of this window that has sections titled General, Tabs, Content, Applications, Privacy, Security, Sync, and Advanced.

Select Privacy. You’ll then see a section titled, Tracking.

Select the check box for Tell websites I do not want to be tracked.

Click OK to close the Options window.


Whenever you browse through the web, Mozilla Firefox will store a lot of information: sites you’ve visited, files you’ve downloaded, and more. This can save time when revisiting sites and help you keep track of where you’ve been. There are some occasions, however, when you might not want other users on your computer to see this information, like if you’re shopping for a birthday present or booking a surprise vacation.

Firefox private browsing lets you browse through the Internet without saving any information about the websites you’ve visited or the files you’ve downloaded. In this tutorial we will be showing you how to set Firefox for private browsing and explain what information is not saved when in this mode.

Firefox private browsing will not save:

  • Visited pages – No web pages will be added to the Internet history menu, the library window’s history list, or the Awesome Bar address list. (The Awesome Bar is a nickname for the Location bar autocomplete feature.)
  • Form and search bar entries – No web page text box or search bar entries will be saved for the Form autocomplete feature.
  • Passwords – No new passwords will be remembered for future use.
  • Download list entries – No downloaded files will be listed in the Download window after you turn off private browsing.
  • Cookies – No site preferences, login statuses, or plugin data will be saved as Cookies.
  • Cache – No temporary Internet files or files that websites save for offline use will be saved.

How to turn on private browsing

  • Open the Mozilla Firefox Internet Browser. On the top, you’ll notice a menu bar that says File, Edit, History, Bookmarks, Tools and Help.
  • Click Tools and then select Start Private Browsing. You can also use the shortcut Ctrl+Shift+P to do this as well.
  • A window will pop up titled Start Private Browsing will alert you that Firefox will save any current windows and tabs for after you finish private browsing. You can click a check box next to the Do not show this message again if you do not want to receive this alert the next time you turn on private browsing. Click the button beneath this message that says Start Private Browsing.
  •  To turn off private browsing, click Tools again and select Stop Private Browsing. The shortcut for this is also Ctrl+Shift+P.

How to always start Firefox in Private Browsing

  • Click on Tools and then select Options. A new window will pop up titled Options. You’ll see a menu bar on the top of this window that has sections titled General, Tabs, Content, Applications, Privacy, Security, Sync, and Advanced.
  • Select Privacy. You’ll then see a section titled, History.
  • Set Firefox will: to Use custom settings for history using the drop down menu.
  • Select the check box for Always use private browsing mode.
  • Click OK to close the Options window.
 

The Firefox Site Identity Button is an internet security feature that provides you with detailed information about the websites you visit. With the Site Identity Button you can figure out if a website you’re visiting is verified, if it is encrypted, who owns the website, and what company verified it. This helps individuals avoid unverified, potential harmful websites that are asking for your personal information.

The Firefox Site Identity Button can be found in the site Location bar to the left of the web address you type in.

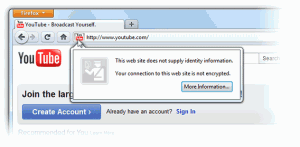
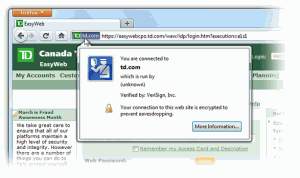
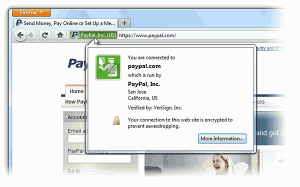
When you click on the Site Identity Button, it will display security information about the website you’re currently viewing. Based on the amount of information and verification provided, the Site Identity Button will be displayed in one of three colors: Gray, Blue, or Green. A matching color Passport Officer icon will also appear when you click on the Site Identity Button.


Gray – No Identity Information

If a website does not provide any identity information at all, then the Site Identity Button will be gray. If you’re entering any personal information into the site, such as back account information, credit card data, or social security numbers, then the Site Identity Button should not be gray. Gray signals you that the connection between Firefox and the server is unencrypted and should not be considered safe against possible eavesdroppers. That being said, you will find that most websites will have a gray button. This is because they do not involve the passing of sensitive information back and forth and do not really need to have verified identities or encrypted connections. As long as the site does not require that you enter personal information, the gray Site Identity Button is no indication of a problem with the site.

Blue – Basic Identity Information

When the Site Identity Button is blue, this lets you know that the site’s domain has been verified, and that the connection between Firefox and the server is encrypted and therefore protected against eavesdroppers. This means that the organization or people who are running the site in question have purchased a certificate proving that they are the owners of the domain name and it is not being spoofed by spammers. However, the company that owns the domain isn’t verified. There would be no guarantee that sunnysurfshop.com is actually owned by the Sunny Surf Shop. The only thing you know is that the domain is valid and that the connection is encrypted.


Green – Complete Identity Information

If a website provides fully verified information about its owner and that the connection is encrypted, then the Site Identity Button will be Green. This means that the website is using a new Extended Validation (EV) certificate. An EV certificate is a special type of site certificate that requires a significantly more detailed identity verification process than other processes. While the Blue Site Identity Button lets you know that a site is using a secure connection, the Green Site Identity Button shows you that the connection is secure and that the owners of the domain are who you expect them to be.


Learn how to Export bookmarks from Firefox 11 and then Import them onto a different Internet Browser or Computer. Setting up your favorites over and over again when you change your computer can be both incredibly frustrating and timeconsuming. In Firefox 11 you can import and export your bookmarks quickly and easily. Follow these simple steps to learn how.


Export Bookmarks Firefox 11

  • Open your Mozilla Firefox 11 Internet Browser.
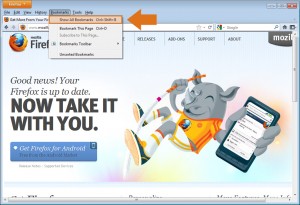
  • On the Firefox menu bar click Bookmarks. If you do not see the Bookmarks Menu Tab, press the ALT key on your keyboard and the menu will appear.
  • Click on the “Show All Bookmarks” option in the Bookmarks menu. As an alternative, click “CTRL + Shift + B” on your keyboard. A new window will pop up on your desktop, titled “Library”.
  • Click on the “ Import and Backup” Drop Menu from the Library Menu Bar located on the top of the window.
  • Click on the “Export Data to HTML” option. A new window will open, titled “Export Bookmarks File”.
  • Save files onto USB Flash Drives or Portable External Hard Drives. You can also save onto your folders if you’re transferring bookmarks between browsers on the same computer.

Import Bookmarks Firefox 11

  • Open your Mozilla Firefox 11 Internet Browser.
  • On the Firefox menu bar click Bookmarks. If you do not see the Bookmarks Menu Tab, press the ALT key on your keyboard and the menu will appear.
  • Click on the “Show All Bookmarks” option in the Bookmarks menu. As an alternative, click “CTRL + Shift + B” on your keyboard. A new window will pop up on your desktop, titled “Library”.
  • Click on the “ Import and Backup” Drop Menu from the Library Menu Bar located on the top of the window.
  • Click on the “Import Data from HTML” option. A new window will open, titled “Import Wizard: Import Settings and Data”.
  • Click Next.
  • Select from your computer your Imported Bookmarks File. The file will then automatically populate the new Internet browser.

Your bookmarks will now appear in your Firefox bookmarks menu. You will have to rearrange them in the order you had in your previous Browser, but other than that you’re set!


Firefox 11 Internet Browser lets you import settings, cookies, history, and bookmarks from Google Chrome. Before this version of Firefox, you could import all that from Internet Explorer, Opera and Safari, but not Chrome. If you’ve been using Google Chrome as your primary Internet browser and want to switch to Firefox 11, you will probably want to import your Google Chrome data into Firefox 11.

  • Close your Google Chrome Internet Browser.
  • Open your Firefox 11 Internet Browser
  • On the Firefox menu bar click Bookmarks. If you do not see the Bookmarks Menu Tab, press the ALT key on your keyboard and the menu will appear.
  •  Click on the “Show All Bookmarks” option in the Bookmarks menu. As an alternative, click “CTRL + Shift + B” on your keyboard. A new window will pop up on your desktop, titled “Library”.
  • From the Library Menu click Import and Backup on the top, then Import Data from Another Browser.
  • An Import Wizard window will then pop up. Select Google Chrome and click Next.
  • Select which items you would like to import from Google Chrome. Choose from Bookmarks, Browsing History, and Cookies, then click Next.
  • A message confirms that the import is completed. Click Finish.

Your Google Chrome bookmarks will now appear in your Firefox bookmarks menu. You will have to rearrange them in the order you had in Google Chrome. Browsing history will be available in the History tab in the Firefox menu bar.


Importing and Exporting Firefox 10.0 Bookmarks

Export Bookmarks from Firefox 10.0 and Import them onto a different Internet Browser or Computer.

Have you ever changed computers and became frustrated when you had to set up all your favorites again? In Firefox 10.0 you can move your bookmarks quickly and easily. Follow these  steps below to learn how.

  1. Open Mozilla Firefox 10.0 Internet browser.
  2. Click the Bookmarks Menu Tab in the Menu Bar located on the top left of the browser. If you do not see the Bookmarks Menu Tab, press the ALT key on your keyboard and the menu will appear.

    Click to enlarge

  3. Click on the “Organize Bookmarks…” option in the Bookmarks menu. As an alternative, click “CTRL + Shift + O” on your keyboard. A new window will pop up on your desktop, titled “Library”.
  4. Click on the “ Import and Backup” Drop Menu from the Library Menu Bar located on the top of the window.

    Click to enlarge...

  5. Click on the “Export HTML” option. A new window will open, titled “Export Bookmarks File”.
  6. Save file onto a USB Flash Drive or a Portable External Hard Drive. You can also save onto your  folders if you’re transferring bookmarks between browsers on the same computer.


Importing Firefox 10.0 Bookmarks

If you are switching browsers or using a new computer, you will want to import your bookmarks. Follow these simple steps to learn how.

  1. Repeat steps 1 – 4 from you new Internet browser from above.

    Click to enlarge

  2. Click on the “Import HTML” option. A new window will open, titled “Import Wizard: Import Settings and Data”.

    Click to enlarge...

  3. Click “Next” on the bottom right of the window.
  4. Select from your computer your Imported Bookmarks File. The file will then automatically populate the new Internet browser.
  5. Reopen your Internet Browser and your ready to quick surf!


Now that you have learned how to import and export bookmarks in Firefox 10, check out our tutorial on importing & exporting favorites in Chrome and Internet Explorer.


For bookmark instructions for the most recent Firefox version, check out our latest guide: Firefox 11 Bookmarks


FF9 Bookmarks


Exporting Firefox 9.0 Favorites

Learn to export bookmarks from Firefox 9.0 to use with a different browser or on a different computer.

The first step is to find the Bookmarks menu in the Menu bar towards the top of the screen.  If the Menu bar is missing and you do not see a Bookmarks menu, pressing the alt key on your keyboard will make the  menu appear. To enable the menu permanently, you can go to View > Toolbars and check the Menu Bar option.

When you have located the Bookmarks menu, click on “show all bookmarks” in that menu.

Click to enlarge

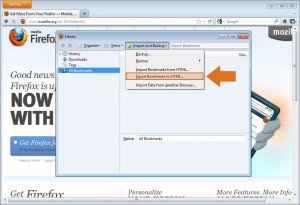
Now a new window will open, titled “library”. Look for the “Import and Backup” menu at the top of this window. Click this button and choose “Export bookmarks to HTML”

Next you will be given the chance to choose where you want to save your bookmark file. I usually save mine to a USB drive, so that I can import my bookmarks on any computer at any time. You can save your file wherever is convenient for you.

Click to enlarge...

Importing Firefox 9.0 Bookmarks

If you are switching browsers or using a new computer, you will want to import your bookmarks. Follow these simple steps to learn how.

Just like in the steps to export your bookmarks, we will first need to locate the Bookmarks menu at the top of the Firefox window. If you do not see the menu bar with the bookmarks menu, press the alt button on your keyboard.

Select “show all bookmarks” from the bookmarks menu.

Click to enlarge


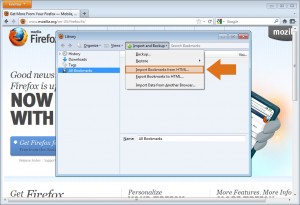
The Firefox library window will open.  Click the Import and Backup button towards the top of the window, and select “Import bookmarks from HTML”.

The final step is to select the backup file you exported from your old browser and Firefox will import them all into the current list of favorites.

Click to enlarge...

Now that you have learned about bookmarks in Firefox 9, check out our tutorial on importing & exporting favorites in Chrome and Internet Explorer.


Export Bookmarks out of Safari

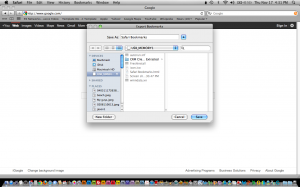
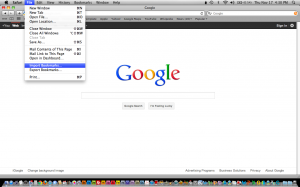
If you are switching computers but want to keep your bookmarks, you will probably want to export them all at once rather than add them all by hand in your new computer. This is very easy to do in Safari, when you know where to look. Start safari and look for the File menu towards the top right. Click file and you will see an option that reads “export bookmarks”. Simply press this button and select where you would like to save the backup file. I usually just save it to a flash drive so that I can easily transfer the file over to another computer.

Click to enlarge...

Click to enlarge...

Need help importing your bookmarks to Firefox, Chrome or Internet Explorer? We have tutorials for that! Check them out here:
Firefox Bookmarks; Chrome Bookmarks; Internet Explorer Bookmarks

Importing Bookmarks into Safari

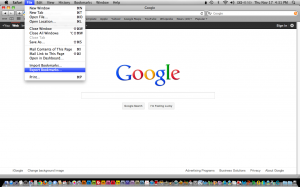
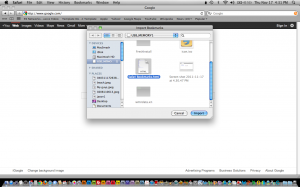
Importing your bookmarks into Safari is just as easy. Once more we find the “file” menu at the top of the screen, and we select “Import”. A window will pop up asking us to navigate to the backup file. Just select the backup file and your bookmarks will be imported! Nice and simple.

Click to enlarge...

Click to enlarge...


Exporting Firefox 8.0 Bookmarks

Mozilla celebrated Firefox’s 7th birthday by releasing a new version. Here is how to Export your favorites in Firefox 8.0.

  • Begin by looking for the “Bookmarks” menu at the top of the window. If you do not see the menu bar, it might be hidden, press the alt key and it should pop up.
  • Under the Bookmarks menu, select “Show All Bookmarks”.

    Click to enlarge

  • Another window will open. Press the button towards the top that reads “Import and Backup”.
  • Out of the available options, choose “Export Bookmarks to HTML…”

    Click to enlarge...

  • Click to enlarge…
  • You will be given a chance to name your bookmark file and choose a place to save it. I usually save mine to the Desktop or to a USB drive so that I can find it easily when I need it.


Importing Firefox 8.0 Bookmarks

If you are using Firefox 8.0 for the first time on a computer, it may be necessary to import your favorites. Here is how to get it done.

  • Just as when you are exporting bookmarks, begin by looking for the “Bookmarks” menu towards the top of the window. This menu is hidden by default, so if you do not see the bookmark menu, pressing the alt button on your keyboard should make it show up.
  • Select “Show All Bookmarks” from the options given.

    Click to enlarge

  • The Library window will open. Click the “Import and Backup” button and select “Import Bookmarks from HTML…”.

    Click to enlarge

  • Now simply direct the program to the .html file where you have your bookmarks saved, and you are all set!

Now check out our tutorial on importing & exporting favorites in Chrome and Internet Explorer.

© 2011 Suffusion theme by Sayontan Sinha
WordPress SEO fine-tune by Meta SEO Pack from Poradnik Webmastera