The Firefox Site Identity Button is an internet security feature that provides you with detailed information about the websites you visit. With the Site Identity Button you can figure out if a website you’re visiting is verified, if it is encrypted, who owns the website, and what company verified it. This helps individuals avoid unverified, potential harmful websites that are asking for your personal information.

The Firefox Site Identity Button can be found in the site Location bar to the left of the web address you type in.

When you click on the Site Identity Button, it will display security information about the website you’re currently viewing. Based on the amount of information and verification provided, the Site Identity Button will be displayed in one of three colors: Gray, Blue, or Green. A matching color Passport Officer icon will also appear when you click on the Site Identity Button.


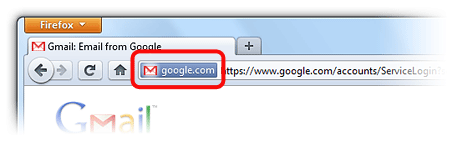
Gray – No Identity Information

If a website does not provide any identity information at all, then the Site Identity Button will be gray. If you’re entering any personal information into the site, such as back account information, credit card data, or social security numbers, then the Site Identity Button should not be gray. Gray signals you that the connection between Firefox and the server is unencrypted and should not be considered safe against possible eavesdroppers. That being said, you will find that most websites will have a gray button. This is because they do not involve the passing of sensitive information back and forth and do not really need to have verified identities or encrypted connections. As long as the site does not require that you enter personal information, the gray Site Identity Button is no indication of a problem with the site.

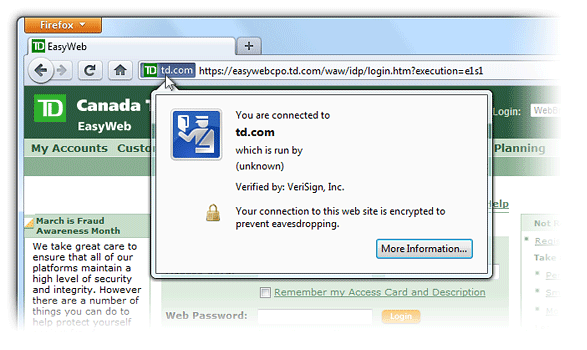
Blue – Basic Identity Information

When the Site Identity Button is blue, this lets you know that the site’s domain has been verified, and that the connection between Firefox and the server is encrypted and therefore protected against eavesdroppers. This means that the organization or people who are running the site in question have purchased a certificate proving that they are the owners of the domain name and it is not being spoofed by spammers. However, the company that owns the domain isn’t verified. There would be no guarantee that sunnysurfshop.com is actually owned by the Sunny Surf Shop. The only thing you know is that the domain is valid and that the connection is encrypted.


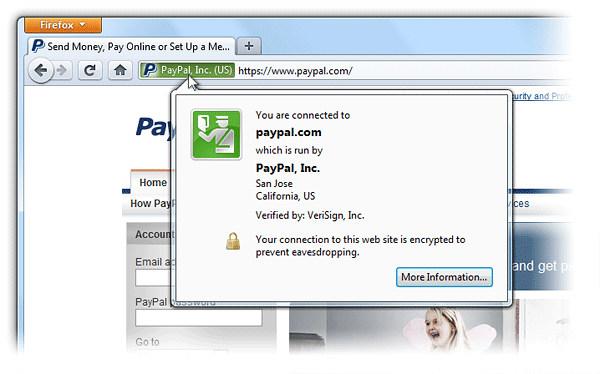
Green – Complete Identity Information

If a website provides fully verified information about its owner and that the connection is encrypted, then the Site Identity Button will be Green. This means that the website is using a new Extended Validation (EV) certificate. An EV certificate is a special type of site certificate that requires a significantly more detailed identity verification process than other processes. While the Blue Site Identity Button lets you know that a site is using a secure connection, the Green Site Identity Button shows you that the connection is secure and that the owners of the domain are who you expect them to be.


You can pin your favorite programs to the Taskbar so that you can access them quickly without opening up folders or navigating through your files. To pin a program to the Taskbar you just need to right-click on its shortcut icon and select Pin to Taskbar. Unfortunately, Windows 7 does not allow you to do this with main system programs like My Documents. That’s just the way the Windows 7 Pin feature works. Personally, I’d like an option which allows you to pin separate folders rather than adding it under the Explorer icon. But, until then we’ll do it the old fashioned way.

In this tutorial we’ll learn how to pin various useful system shortcuts like My Documents, Control Panel, My Computer, Recycle Bin, and Programs and Features, to Windows 7 Taskbar.

1. Create a new shortcut. To do this, right-click on Desktop and select New. You’ll then see a side menu. From this menu, select Shortcut.

2. This will launch the Create Shortcut wizard. Next, enter the command to open your desired system shortcut. You can use any of following commands to create the desired shortcut:

  • explorer shell:MyComputerFolder (for My Computer shortcut)
  • explorer shell:RecycleBinFolder (for Recycle Bin shortcut)
  • explorer shell:ControlPanelFolder (for Control Panel shortcut)
  • explorer shell:Administrative Tools (for Administrative Tools shortcut)
  • explorer shell:ChangeRemoveProgramsFolder (for Programs and Features shortcut)
  • explorer shell:NetworkPlacesFolder (for Network shortcut)
  • explorer shell:Favorites (for Favorites shortcut)
  • explorer shell:HomegroupFolder (for Homegroup shortcut)
  • explorer shell:Games (for Games shortcut)
  • explorer shell:UserProfiles (for Users folder shortcut)
  • explorer shell:Profile (for your username folder shortcut)
  • explorer shell:Public (for Public folder shortcut)
  • explorer shell:My Documents (for Documents shortcut)
  • explorer shell:Common Documents (for Public Documents shortcut)
  • explorer shell:My Music (for Music folder shortcut)
  • explorer shell:CommonMusic (for Public Music folder shortcut)
  • explorer shell:My Pictures (for Pictures folder shortcut)
  • explorer shell:CommonPictures (for Public Pictures folder shortcut)
  • explorer shell:My Video (for Videos folder shortcut)
  • explorer shell:CommonVideo (for Public Videos folder shortcut)
  • explorer shell:Downloads (for Downloads folder shortcut)
  • explorer shell:CommonDownloads (for Public Downloads folder shortcut)

For this example, we will be using the My Documents shortcut.

3. After entering the command, click on Next button located on the bottom right of the Create Shortcut Wizard.

4. Next the Wizard will ask you: What would you like to name the shortcut? Enter a name for your new shortcut and click on Finish button. This will create a new shortcut on the Desktop.

5. Next we’re going to change the new shortcut icon. Right-click the newly created shortcut icon on your desktop and select Properties.  Then click on the Change Icon button.

6. Browse and select any desired icon. We recommend using the imageres.dll file for selecting new icon as this file contains lots of good default icons. To do this, enter imageres.dll under Look for icons in this file then select Browse.  

7. After you’ve selected your new icon, click on OK and then Apply the changes.

8. Finally, pin this new shortcut to Taskbar. You can either drag-n-drop the shortcut to Taskbar or right-click on the shortcut and select Pin to Taskbar option.


You’re finished! Why Microsoft believed their set up would work easier is beyond me, but for now, this is what we’ll have to put up with.


Learn how to Export bookmarks from Firefox 11 and then Import them onto a different Internet Browser or Computer. Setting up your favorites over and over again when you change your computer can be both incredibly frustrating and timeconsuming. In Firefox 11 you can import and export your bookmarks quickly and easily. Follow these simple steps to learn how.


Export Bookmarks Firefox 11

  • Open your Mozilla Firefox 11 Internet Browser.
  • On the Firefox menu bar click Bookmarks. If you do not see the Bookmarks Menu Tab, press the ALT key on your keyboard and the menu will appear.
  • Click on the “Show All Bookmarks” option in the Bookmarks menu. As an alternative, click “CTRL + Shift + B” on your keyboard. A new window will pop up on your desktop, titled “Library”.
  • Click on the “ Import and Backup” Drop Menu from the Library Menu Bar located on the top of the window.
  • Click on the “Export Data to HTML” option. A new window will open, titled “Export Bookmarks File”.
  • Save files onto USB Flash Drives or Portable External Hard Drives. You can also save onto your folders if you’re transferring bookmarks between browsers on the same computer.

Import Bookmarks Firefox 11

  • Open your Mozilla Firefox 11 Internet Browser.
  • On the Firefox menu bar click Bookmarks. If you do not see the Bookmarks Menu Tab, press the ALT key on your keyboard and the menu will appear.
  • Click on the “Show All Bookmarks” option in the Bookmarks menu. As an alternative, click “CTRL + Shift + B” on your keyboard. A new window will pop up on your desktop, titled “Library”.
  • Click on the “ Import and Backup” Drop Menu from the Library Menu Bar located on the top of the window.
  • Click on the “Import Data from HTML” option. A new window will open, titled “Import Wizard: Import Settings and Data”.
  • Click Next.
  • Select from your computer your Imported Bookmarks File. The file will then automatically populate the new Internet browser.

Your bookmarks will now appear in your Firefox bookmarks menu. You will have to rearrange them in the order you had in your previous Browser, but other than that you’re set!


Firefox 11 Internet Browser lets you import settings, cookies, history, and bookmarks from Google Chrome. Before this version of Firefox, you could import all that from Internet Explorer, Opera and Safari, but not Chrome. If you’ve been using Google Chrome as your primary Internet browser and want to switch to Firefox 11, you will probably want to import your Google Chrome data into Firefox 11.

  • Close your Google Chrome Internet Browser.
  • Open your Firefox 11 Internet Browser
  • On the Firefox menu bar click Bookmarks. If you do not see the Bookmarks Menu Tab, press the ALT key on your keyboard and the menu will appear.
  •  Click on the “Show All Bookmarks” option in the Bookmarks menu. As an alternative, click “CTRL + Shift + B” on your keyboard. A new window will pop up on your desktop, titled “Library”.
  • From the Library Menu click Import and Backup on the top, then Import Data from Another Browser.
  • An Import Wizard window will then pop up. Select Google Chrome and click Next.
  • Select which items you would like to import from Google Chrome. Choose from Bookmarks, Browsing History, and Cookies, then click Next.
  • A message confirms that the import is completed. Click Finish.

Your Google Chrome bookmarks will now appear in your Firefox bookmarks menu. You will have to rearrange them in the order you had in Google Chrome. Browsing history will be available in the History tab in the Firefox menu bar.


Let’s take a look at how to clear your browser history from Firefox 10.0 and cache. The Firefox Internet history keeps tabs on all of the websites and links you’ve visited using the Firefox browser. Separately, the Firefox cache transparently stores your Internet search history data so that future requests for that data can be initiated faster. When this data grows substantially, it can slow down your computer.


How to clear Firefox Recent History


  1. Open Firefox 10.0 Internet Browser.
  2. Locate the Internet menu bar on the top left of the Internet window. You should see tabs labeled: File, Edit, View, History, Bookmarks, Tools, and Help.
  3. Click on the Tools tab.
  4. Using your mouse, navigate down and click on Clear Recent History. If you’d like to use the keyboard shortcut, press Ctrl + Shift + Delete.
  5. A window labeled Clear Recent History will pop up on you desktop. Next to the text Time range to clear there is a drop down menu. Click on it.
  6. There will be time range choices labeled Last Hour, Last Two Hours, Last Four Hours, Today, and Everything. Click on your time range. Note: Clicking Today will delete browser history since 12:00am that day. Clicking Everything will delete all of your Internet search history.
  1. Below Time range to clear is the text Details. Next to Details is a small drop down menu button.
  2. Here you’ll see the options Browsing & Download History, Form & Search History, Cookies, Cache, Active Logins, and Site Preferences. Some of these will already be selected. Make sure that Browsing & Download History, Form & Search History, and Cache are selected.
  3. Press Clear Now.


Finished! You can clear this history as many times as you like.


Importing and Exporting Firefox 10.0 Bookmarks

Export Bookmarks from Firefox 10.0 and Import them onto a different Internet Browser or Computer.

Have you ever changed computers and became frustrated when you had to set up all your favorites again? In Firefox 10.0 you can move your bookmarks quickly and easily. Follow these  steps below to learn how.

  1. Open Mozilla Firefox 10.0 Internet browser.
  2. Click the Bookmarks Menu Tab in the Menu Bar located on the top left of the browser. If you do not see the Bookmarks Menu Tab, press the ALT key on your keyboard and the menu will appear.

    Click to enlarge

  3. Click on the “Organize Bookmarks…” option in the Bookmarks menu. As an alternative, click “CTRL + Shift + O” on your keyboard. A new window will pop up on your desktop, titled “Library”.
  4. Click on the “ Import and Backup” Drop Menu from the Library Menu Bar located on the top of the window.

    Click to enlarge...

  5. Click on the “Export HTML” option. A new window will open, titled “Export Bookmarks File”.
  6. Save file onto a USB Flash Drive or a Portable External Hard Drive. You can also save onto your  folders if you’re transferring bookmarks between browsers on the same computer.


Importing Firefox 10.0 Bookmarks

If you are switching browsers or using a new computer, you will want to import your bookmarks. Follow these simple steps to learn how.

  1. Repeat steps 1 – 4 from you new Internet browser from above.

    Click to enlarge

  2. Click on the “Import HTML” option. A new window will open, titled “Import Wizard: Import Settings and Data”.

    Click to enlarge...

  3. Click “Next” on the bottom right of the window.
  4. Select from your computer your Imported Bookmarks File. The file will then automatically populate the new Internet browser.
  5. Reopen your Internet Browser and your ready to quick surf!


Now that you have learned how to import and export bookmarks in Firefox 10, check out our tutorial on importing & exporting favorites in Chrome and Internet Explorer.


For bookmark instructions for the most recent Firefox version, check out our latest guide: Firefox 11 Bookmarks


FF9 Bookmarks


Exporting Firefox 9.0 Favorites

Learn to export bookmarks from Firefox 9.0 to use with a different browser or on a different computer.

The first step is to find the Bookmarks menu in the Menu bar towards the top of the screen.  If the Menu bar is missing and you do not see a Bookmarks menu, pressing the alt key on your keyboard will make the  menu appear. To enable the menu permanently, you can go to View > Toolbars and check the Menu Bar option.

When you have located the Bookmarks menu, click on “show all bookmarks” in that menu.

Click to enlarge

Now a new window will open, titled “library”. Look for the “Import and Backup” menu at the top of this window. Click this button and choose “Export bookmarks to HTML”

Next you will be given the chance to choose where you want to save your bookmark file. I usually save mine to a USB drive, so that I can import my bookmarks on any computer at any time. You can save your file wherever is convenient for you.

Click to enlarge...

Importing Firefox 9.0 Bookmarks

If you are switching browsers or using a new computer, you will want to import your bookmarks. Follow these simple steps to learn how.

Just like in the steps to export your bookmarks, we will first need to locate the Bookmarks menu at the top of the Firefox window. If you do not see the menu bar with the bookmarks menu, press the alt button on your keyboard.

Select “show all bookmarks” from the bookmarks menu.

Click to enlarge


The Firefox library window will open.  Click the Import and Backup button towards the top of the window, and select “Import bookmarks from HTML”.

The final step is to select the backup file you exported from your old browser and Firefox will import them all into the current list of favorites.

Click to enlarge...

Now that you have learned about bookmarks in Firefox 9, check out our tutorial on importing & exporting favorites in Chrome and Internet Explorer.


Export Bookmarks out of Safari

If you are switching computers but want to keep your bookmarks, you will probably want to export them all at once rather than add them all by hand in your new computer. This is very easy to do in Safari, when you know where to look. Start safari and look for the File menu towards the top right. Click file and you will see an option that reads “export bookmarks”. Simply press this button and select where you would like to save the backup file. I usually just save it to a flash drive so that I can easily transfer the file over to another computer.

Click to enlarge...

Click to enlarge...

Need help importing your bookmarks to Firefox, Chrome or Internet Explorer? We have tutorials for that! Check them out here:
Firefox Bookmarks; Chrome Bookmarks; Internet Explorer Bookmarks

Importing Bookmarks into Safari

Importing your bookmarks into Safari is just as easy. Once more we find the “file” menu at the top of the screen, and we select “Import”. A window will pop up asking us to navigate to the backup file. Just select the backup file and your bookmarks will be imported! Nice and simple.

Click to enlarge...

Click to enlarge...


Exporting Firefox 8.0 Bookmarks

Mozilla celebrated Firefox’s 7th birthday by releasing a new version. Here is how to Export your favorites in Firefox 8.0.

  • Begin by looking for the “Bookmarks” menu at the top of the window. If you do not see the menu bar, it might be hidden, press the alt key and it should pop up.
  • Under the Bookmarks menu, select “Show All Bookmarks”.

    Click to enlarge

  • Another window will open. Press the button towards the top that reads “Import and Backup”.
  • Out of the available options, choose “Export Bookmarks to HTML…”

    Click to enlarge...

  • Click to enlarge…
  • You will be given a chance to name your bookmark file and choose a place to save it. I usually save mine to the Desktop or to a USB drive so that I can find it easily when I need it.


Importing Firefox 8.0 Bookmarks

If you are using Firefox 8.0 for the first time on a computer, it may be necessary to import your favorites. Here is how to get it done.

  • Just as when you are exporting bookmarks, begin by looking for the “Bookmarks” menu towards the top of the window. This menu is hidden by default, so if you do not see the bookmark menu, pressing the alt button on your keyboard should make it show up.
  • Select “Show All Bookmarks” from the options given.

    Click to enlarge

  • The Library window will open. Click the “Import and Backup” button and select “Import Bookmarks from HTML…”.

    Click to enlarge

  • Now simply direct the program to the .html file where you have your bookmarks saved, and you are all set!

Now check out our tutorial on importing & exporting favorites in Chrome and Internet Explorer.


Ever since I first got a phone capable of browsing the world wide web, I’ve always thought there was something lacking from the experience. Typing on a number pad, viewing websites on phone screens with strange resolutions, no Flash support. Over the last few years many of these problems have been addressed. Most phones now have full keyboards, mobile websites have set standards that most mobile devices follow, some phones even support Flash these days! (Not my iPhone, of course ಠ_ಠ ) With all these improvements, it is only natural, I suppose, that our home internet begins merging with our mobile internet. To truly make the transition from laptop, to phone, to work computer seamless, Firefox creator, Mozilla, has made Firefox Home. Have you ever looked something up online before leaving your house, and then not being able to find it again? That will not be an issue if you have Firefox Home as it syncs your browser at home, with the one in your phone. Now when you leave the house, the tabs you had open on your PC are still open on your phone. Something you bookmarked at work is now easily accessible at home. I imagine the benefits of this integration are already clear to you, so let’s move on to how to get it done:


Installing and Configuring Firefox Home

You will need to be using Firefox on the computers you want to sync with Firefox Home. I hope this was obvious. If it wasn’t, Click Here, for the download. If Firefox wasn’t your default browser, you might want to import your bookmarks. Luckily I’ve recently wrote a tutorial for that too: Import your bookmarks into firefox

Now that you’ve got Firefox installed, you need to get the Firefox Home app for your phone. I have an iPhone so that’s what I’ll use for these instructions.

Start by going to the app store on your phone, and downloading Firefox Home. You can find it easily by typing firefox into the search. Allow the app to install. Once you start the app, you will be asked if you already have a sync account, or if you’d like to receive instructions on creating one. You can forgo the the instructions, since I will be outlining them here.


At this point, put your phone aside and open Firefox on your computer. Click the Tools menu from the Menu bar and select “options” at the very bottom of the menu.


Select the “Sync” tab at the top of the options window, then click on “Set Up Firefox Sync”. Click OK.

At the next prompt, click the “Create a New Account” button.

Enter your account details on this next page. Note the options button on the bottom left. Clicking here will allow you to choose what is shared between devices with Firefox Home. By default everything is shared, feel free to customize this to your needs. Once you have filled out all the fields, click Next.

Firefox will create a unique code for you to sync to other computers. Save this code somewhere safe. You will also have the option to print the code. Once you have saved your encryption code, click Next.

Next you will be asked to fill out a Re-Captcha to verify you are human. Type in the text, and click Next.

So far so good, you’ve finished creating your account. Now to set it up on your devices.

When you click finish you will be taken back to the sync tab in the options menu. There will now be an option to “add a device”. This is the next step.

The next screen will ask you to enter a code that the device provides. Take out your phone and start up the Firefox Home app. Select the “I have a sync account” option and your phone will provide a 12 character code split into 3 lines. Type this code into the computer and click next.


That’s it! Your phone is now synced with your computer browser. You can add multiple devices to Firefox home (such as your iPhone and iPad) or multiple computer (such as your home and work computer). Enjoy your cross-platform browsing!


© 2011 Suffusion theme by Sayontan Sinha
WordPress SEO fine-tune by Meta SEO Pack from Poradnik Webmastera