mike


Why Print to a PDF?

Many of us are familiar with PDF files and have been using them for years, but what is a PDF anyway? A PDF File is a “Portable Document Format” file, and it used for just that: documents. It has several advantages to a simple text file. For one, it is standardized. Most any company you deal with will be able to open a PDF file, and if not, Adobe’s PDF software is free and easy to download. You can send the file without having to worry about the recipient having the same software as you to open it. PDF files can hold images. Not just rasterized images, but vector images which can be stretched and printed as large as you want without losing sharpness and picture quality. You can send PDFs that are locked and the text cannot be changed, or send a form where only certain fields are modifiable. You can even sign and validate your signature electronically with PDFs. So clearly, these files are invaluable tools in the office, but which PDF printer is best?

Choosing a PDF Printer

If you type “PDF Printer” into a search engine, you will likely be overwhelmed with the number of results. There are countless different programs that allow you to print documents to PDF. We can narrow them down a bit, by eliminating those programs that are not free. Out of the remaining free software, I will also exclude the programs that punish users with a plethora of advertisements. After all, we want a PDF printer, not adware. This leaves us with a more manageable list of software. These are the printers I tried out. There are almost certainly others that I did not try, so if you know of one I don’t mention, please leave a comment at the bottom of the post!

  • http://www.bullzip.com/  (Windows 2000/XP/Vista/7)
    Very good software, the one I used when I needed a PDF printer in the past. Includes practically every feature you could want. Light program as well, just 4.4 MB. One issue I had was that some of the PDF files I created were not searchable.
  • http://en.pdf24.org/creator.html  (XP/Vista/7)
    PDF24 offers both reading and writing functions, so you wont need Adobe PDF reader if you’ve got this installed.
  • http://www.cutepdf.com/ (Windows 98/ME/2000/XP/Vista/7)
    Compact program, less than 4 MB. Good if you need very basic functions, but it was lacking in some of the features available in the other programs.
  • http://www.primopdf.com/index.aspx (Windows 98/2000/XP/Vista/7 – x32 & x64)
    Very interesting function – without opening the program you can drag and drop a file onto the shortcut, and Primo pdf will open, convert the file, save it, and close. Pretty cool!


Installing your PDF Printer

Now that you’ve had a chance to consider your PDF printing options, it’s time to install one and set it up. For this tutorial, I will be installing Bullzip on Windows 7 32-bit. Installing other software is quite similar, so follow along and you shouldn’t have any trouble.

Begin, of course, by downloading the installation file from bullzip.com. The download is in the form of a .zip file, so you will need software to unpack it, download and install WinRar if you don’t have the software to extract the file already. When you unpack the .zip file you downloaded from bullzip, you will find the bullzip installation file. Run this file, clicking next when appropriate, agreeing to their license agreements (after reading it thoroughly, of course!), and allowing it to download the GhostScript Lite dependencies it requires to  function. Installation should complete in a flash. Upon completion of the install, your printers window will pop up and you will see Bullzip PDF printer installed and set as your default printer! Personally, I have a physical printer in the office that I prefer to leave as the default, so I changed it back by right clicking on the physical printer and selecting “Set as Default Printer”, you may or may not want to do the same.

Using Your PDF Printer

Printing a file to PDF is simple and straightforward. Open the file you want to save as a PDF and go to “Print” from the “File” menu. Select your PDF printer if it isn’t already set as default and hit “print”. Bullzip will open up and give you all the options available. You will be able to name the file, choose the directory of where to save it, add watermarks or password protect your file. Select the options that you need and click “Save”. That’s all there is to it! You’ve saved your file to a PDF and it is ready to be emailed or saved onto your USB drive!


I came across this video earlier today, and since I work with USB Drives so often, it was quite interesting to see how they are actually produced. It’s crazy how complex a lot of every day objects are, making a flash drive is certainly not a DIY project. Yet with the technology and machinery available today, computer electronics can be produced in no time at all. Take a look for yourselves, this is almost certainly not something you have seen before.


Select your Browser:

Mozilla Firefox 7

(skip to Chrome 14 or Internet Explorer 9)

Exporting and Backing Up Your Bookmarks


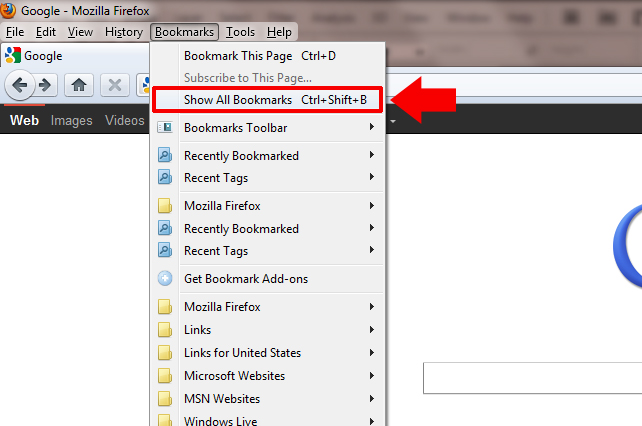
Begin by starting Firefox. Once it has opened, find the “Bookmarks” tab in the menu bar located on the top left of the screen.

Select “Show All Bookmarks” from the drop-down menu that appears.

This will open a new “Library” window. Look for the “Import & Backup” menu towards the top. Click on “Export HTML…”

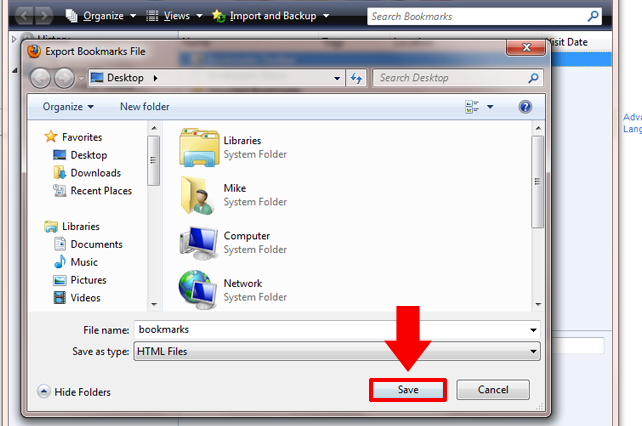
This will allow you to choose a name and location for your backup file. For this tutorial, we will leave the default name “bookmarks” and save it on the desktop. Feel free to rename the file and save it where you see fit.

Congratulations! You’ve successfully backed up your bookmarks. Keep this file somewhere safe and you will be able to restore your bookmarks on this or any other computer. I save the file on a USB Flash Drive that I keep on my keychain, so I’m never without my bookmarks. Another great way to save the file is to email yourself, saving the bookmark file as an attachment. That way your file is safely stored in your email indefinitely (just make sure not to delete that email!). So how do you actually use this file to import your bookmarks? Funny you should ask…

Importing Your Bookmarks

So you’ve created a backup of your bookmarks, and now you need to Import them. There are plenty of reasons you may need to. Maybe you’ve bought a brand new computer or reformatted your old one. Maybe your old internet browser sucks and you downloaded a new one (I’m looking at you Internet Explorer  ಠ_ಠ). Or maybe you just need to access your bookmarks from the office or from a friends house. This is how you do it:


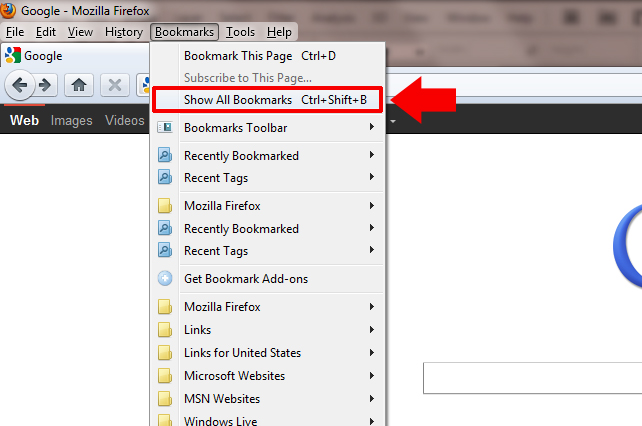
Open up Firefox, and click on “Show All Bookmarks” in the Bookmarks menu, just as you did to export your bookmarks in the first place.

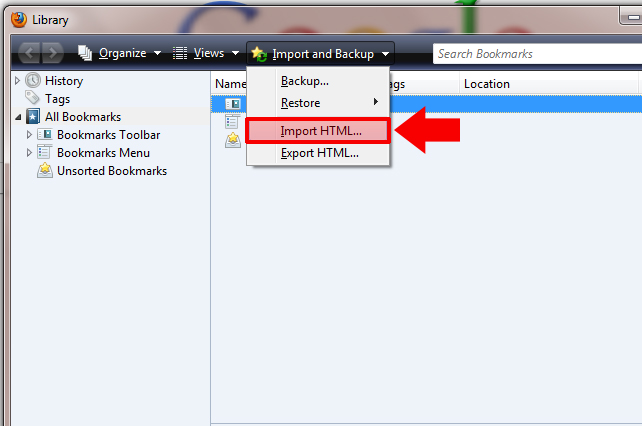
This time we will be looking for the “Import HTML…” button, under the “Import and Backup” menu.

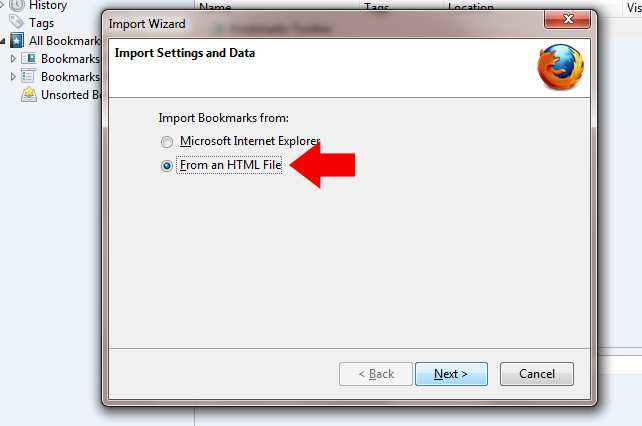
Clicking on Import will launch the “Import Wizard”. It will ask if you want to import from Internet Explorer, or from an HTML file. In this case, we choose HTML file.

Clicking Next will allow us to navigate to the backup file. Mine is on my desktop, but yours may be on your USB Drive, in your download folder (if you emailed it to yourself and then downloaded it from your email) or anywhere else you might have decided is a good place to keep the file. Simply find the file, select it and click “Open”.

Voilà! Your bookmarks have been imported!


Chrome 14

(back to Firefox 7 or skip to Internet Explorer 9)

Exporting and Backing Up Your Bookmarks

Exporting your bookmarks in Chrome is very similar to exporting bookmarks in Firefox, you just need to know where to find the proper menus and options.
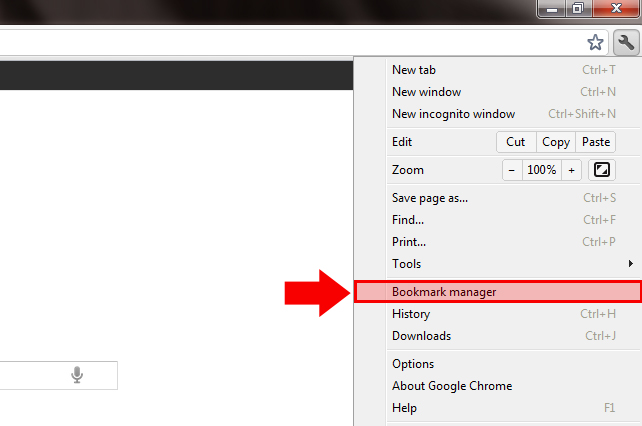
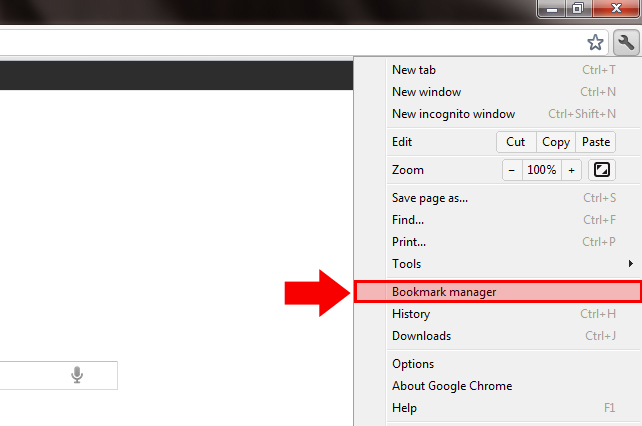
Start by opening Chrome and finding the options button. The options button is a wrench icon, and is located on the top right of the window.

Select “Bookmark manager” from the options menu, and a new tab will open in Chrome.


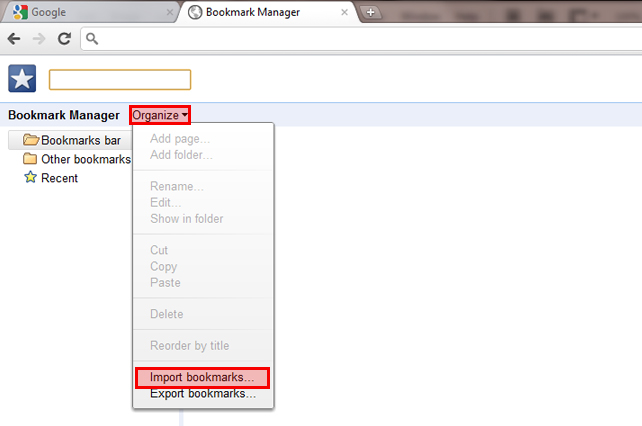
Click on the “Organize” drop down menu, and you will find the familiar “Export bookmarks…” command.

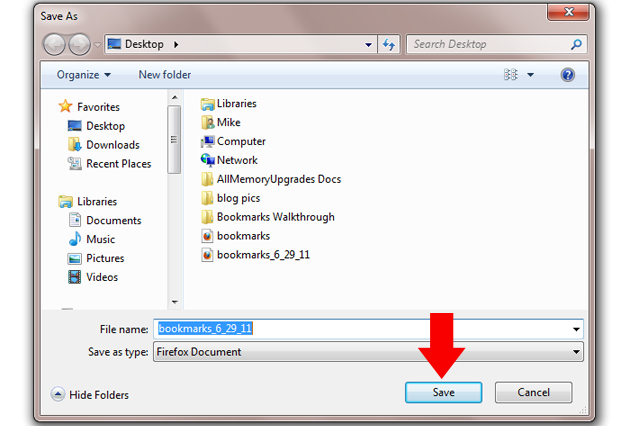
Clicking on Export Bookmarks will open a screen allowing you to choose a destination for you bookmark backup file. Once more, I am saving onto my desktop, but you may save onto a USB Memory Drive or anywhere else you please, just be sure you know where to find the file when you need it.

Click save and that’s it! Your bookmarks are saved for future use. If you skipped the Firefox section, I gave a helpful tip about sending this file to yourself as an email attachment. This way you can access the file anywhere in the world, so long as you have a working internet connection. Personally I save the file to a USB drive. It’s the most convenient thing for me, as I always have my flash drive on hand (it’s on my keyring, so I literally never leave home without it). Plus you can keep all kinds of other useful files on the drive.

Importing Your Bookmarks

Once more open the Bookmark Manager, just as we did to backup the bookmarks.

Click on “Organize” and this time, select “Import bookmarks…”

Navigate to the bookmark backup file, select it, and click “open”.

Well done! You have imported your bookmarks and can now browse the internet unimpeded! (Assuming you aren’t behind a webfilter or in a country that blocks certain internet traffic.)


(back to Firefox 7 or Chrome 14)

Exporting and Backing Up Your Bookmarks


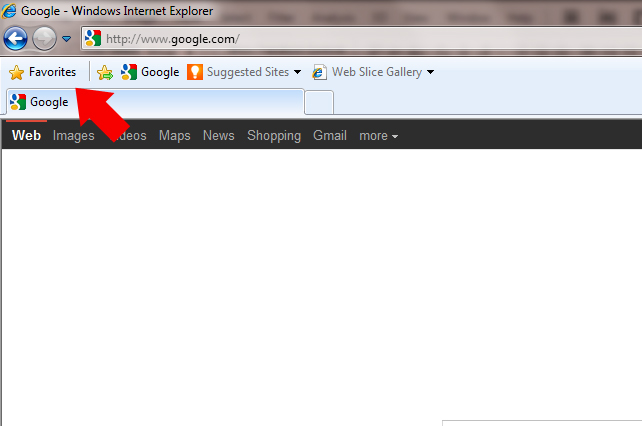
Begin by starting Internet explorer. Look for the Favorites button with a yellow star next to it, towards the top left of the screen.

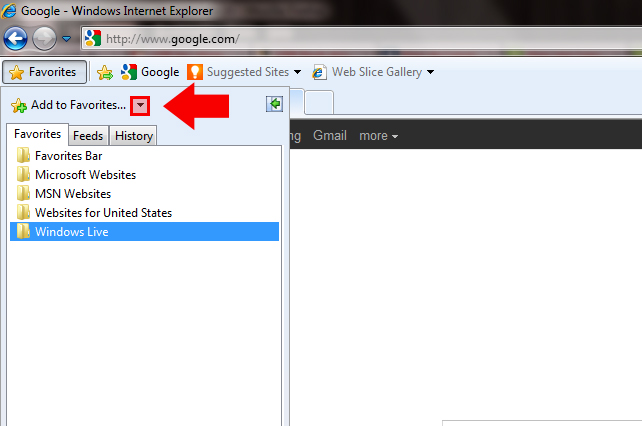
Clicking on the Favorites button will open the favorites sidebar. At the top of the sidebar you will find the “Add to Favorites…” button, with a small arrow beside it. Click directly on the arrow and a small drop-down menu will appear.

Choose “Import and Export…” from the drop down menu.

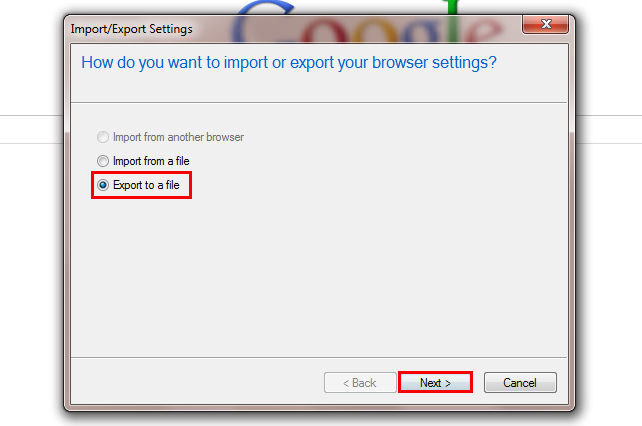
A small window will open and give you the option of Importing your bookmarks, or exporting them. Make sure “Export to a file” is selected, and click next.

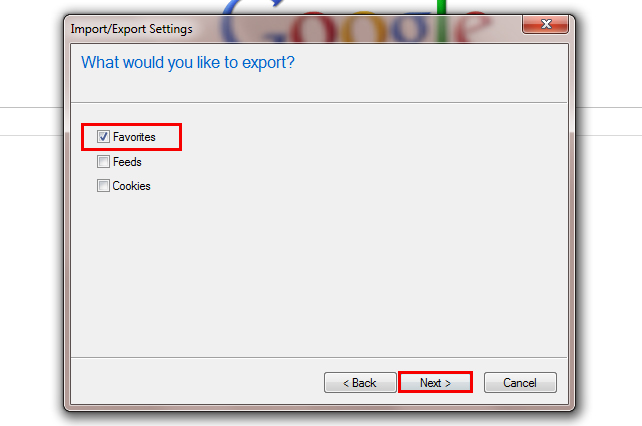
It will now give you the option to export your cookies and feeds as well as your favorites. For this tutorial we will only select “Favorites”.

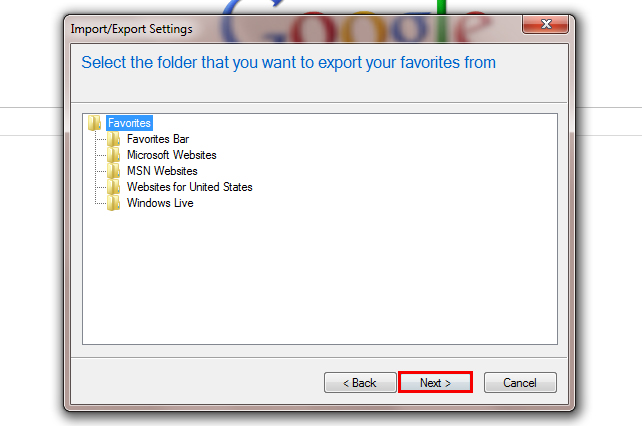
Next Internet Explorer will give you the option of selecting which of your bookmarks you want to save. To save them all, we want the top folder, “Favorites”, selected. This is set up for you by default so unless you only want to export part of your favorites, leave it this as is and click “Next >”.

Finally you will be asked where you want to save your backup. For convenience I saved mine to the Desktop, but you may choose to save it elsewhere. Once you selected a place to save the file, click “Export”.

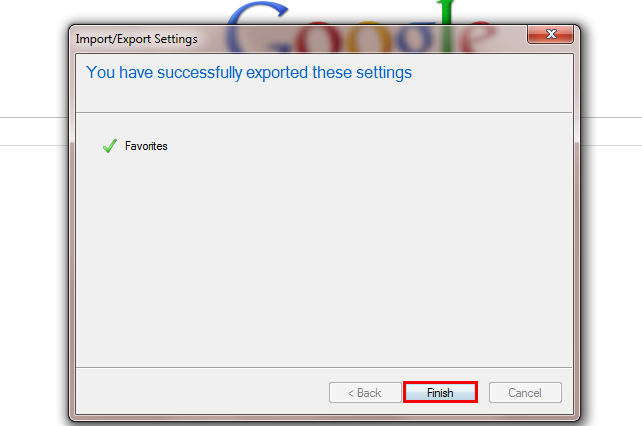
Internet Explorer will now inform you of your resounding success. Nothing left to do but click “Finish” and bask in the warm feeling of accomplishment.


Importing Your Bookmarks


If you followed my guide to export your Internet Explorer bookmarks, these first few steps may seem familiar, and they should, because they are exactly the same.

Begin by starting Internet explorer. Look for the Favorites button with a yellow star next to it, towards the top left of the screen.

Clicking on the Favorites button will open the favorites sidebar. At the top of the sidebar you will find the “Add to Favorites…” button, with a small arrow beside it. Click directly on the arrow and a small drop-down menu will appear.

Choose “Import and Export…” from the drop down menu.

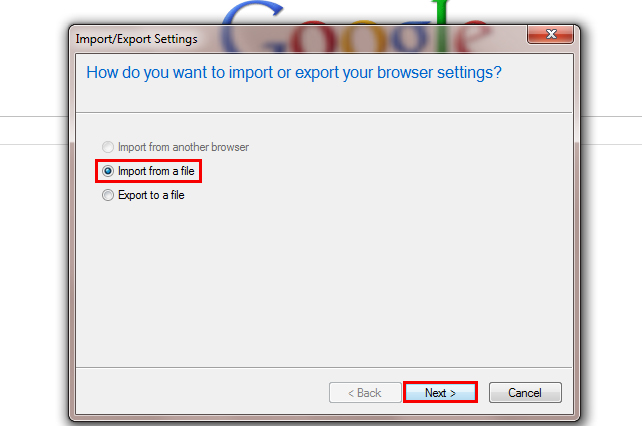
A small window will open and give you the option of Importing your bookmarks, or exporting them. This time, make sure “Import from a file” is selected, and click next.

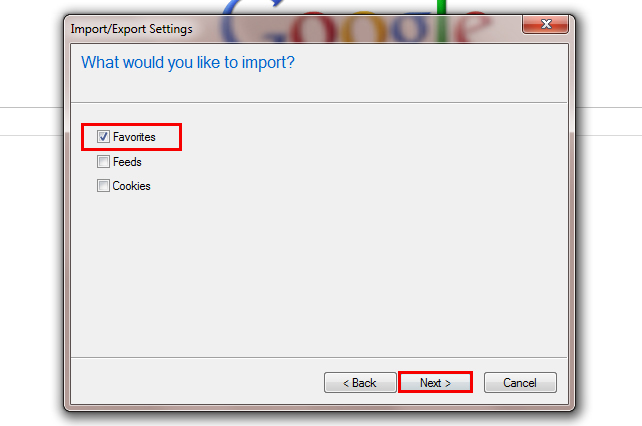
Again Internet Explorer will give you the option of importing your favorites, cookies and feeds. I will only be importing the Favorites, though you may choose to import Feeds and Cookies as well if you feel this is necessary. Click on the squares by the options to check them, and click “Next >” when you are finished.

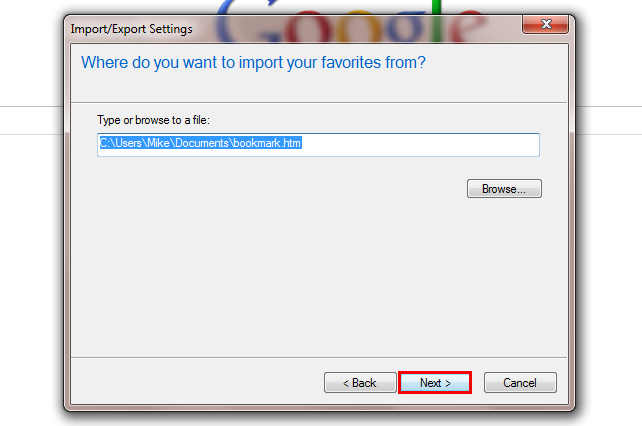
It will now ask you where the backup file is located. Use the browse button to locate your backup file and click next.

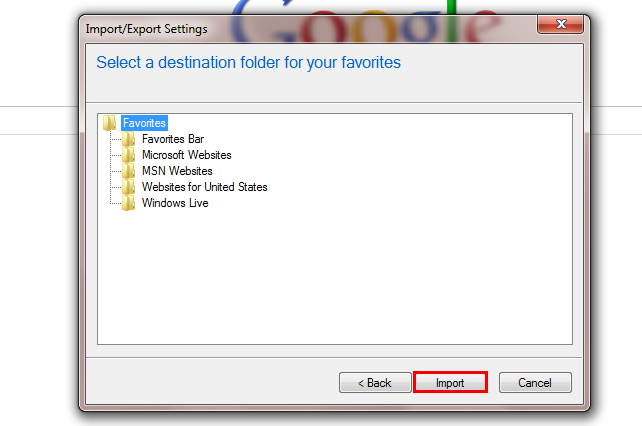
Now you will have the opportunity to choose where in the favorites folder you want your imported bookmarks to appear. For example, if you want to keep the imported favorites in a separate folder called “Imported Bookmarks” you will be able to do that. To have the favorites save to the main favorites list, just leave the top folder selected and click “Import”.

Internet Explorer will let you know that you have successfully imported your bookmarks. The only thing left to do is click “Finish”.

Congratulations, you are now a master at backing up, exporting and importing your bookmarks/favorites.


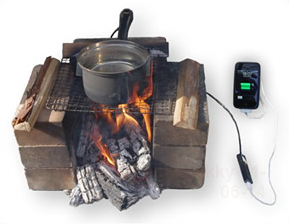
I don’t know how many other people might find this useful, but as an avid camper and technology buff, I often find myself running out of juice on extended camping trips. Rather than run my car for an hour to get a 10% charge on my phone, I am considering this nifty USB device. Sure, at $280 its a bit steep for a USB charging pot, but you will surely be the envy of any boy scouts, hikers or Sasquatches that cross your path.


Check out the Pan Charger for yourself at TES-NewEnergy’s website.

© 2011 Suffusion theme by Sayontan Sinha
WordPress SEO fine-tune by Meta SEO Pack from Poradnik Webmastera